Ghost nails are manicures built around the friendly, sheet-shaped ghost motif, and they rank among the most popular Halloween nails because they work at any length or finish. This guide covers 12 distinct looks for women, from soft pearl glazes to properly spooky smoky faces. It suits beginners who want a single accent nail and nail-art fans who want sculpted detail.
What separates a set of ghost nails worth saving during spooky season from the tenth white blob you scrolled past? Usually it is not the ghost at all. It is the base color, the finish, or how the shape is built, so every idea here changes at least one of those.
One honest limitation: a single motif only stretches so far, so a few ideas differ mainly in finish and technique. The list of ghost nails stops at 12 because a 13th would be padding.
1. Sculpted Drape Ghost Nails
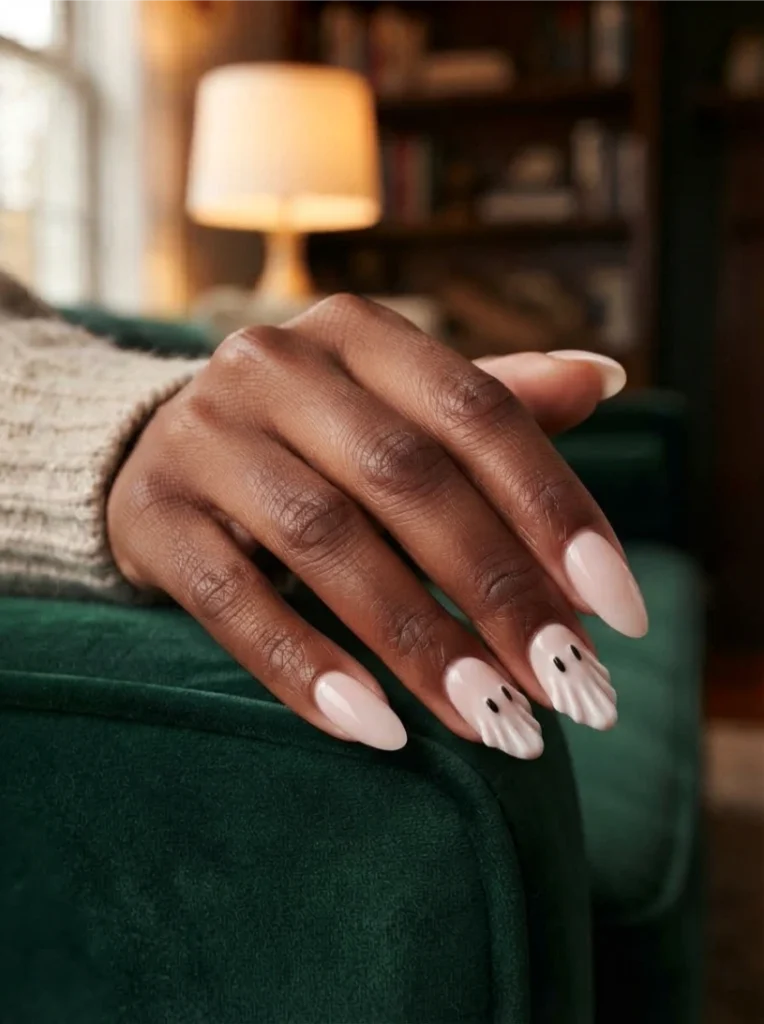
A sculpted ghost, the classic 3D nail art approach, is built from thick builder gel pulled downward into three soft ridges, so the hem reads like real fabric folds instead of a flat white shape.
Place the body on the free edge and leave the cuticle area sheer milky pink, which stops the white from looking heavy and helps the raised detail sit naturally on the nail bed. Make the eyes small vertical ovals rather than round dots, since ovals read as hollow and give the face a slightly wistful expression.
Limit the sculpted ghost to two or three nails and keep the rest flat and glossy, so the dimensional work stays the focal point. Tint the gel with a whisper of pearl at the hem and it will catch light along each ridge. Cure in short bursts between ridges so the shape holds instead of slumping toward the tip.
Nail Shape Match
Long almond or coffin gives the ghost room to drape. On short nails the ridges collapse into a blob, so skip this idea there.
Durability
Raised gel sits proud of the surface, so it snags on knits and hair ties. A thin acrylic overlay underneath adds strength. File the hem smooth if it catches.
2. Glazed Pearl Ghost Nails
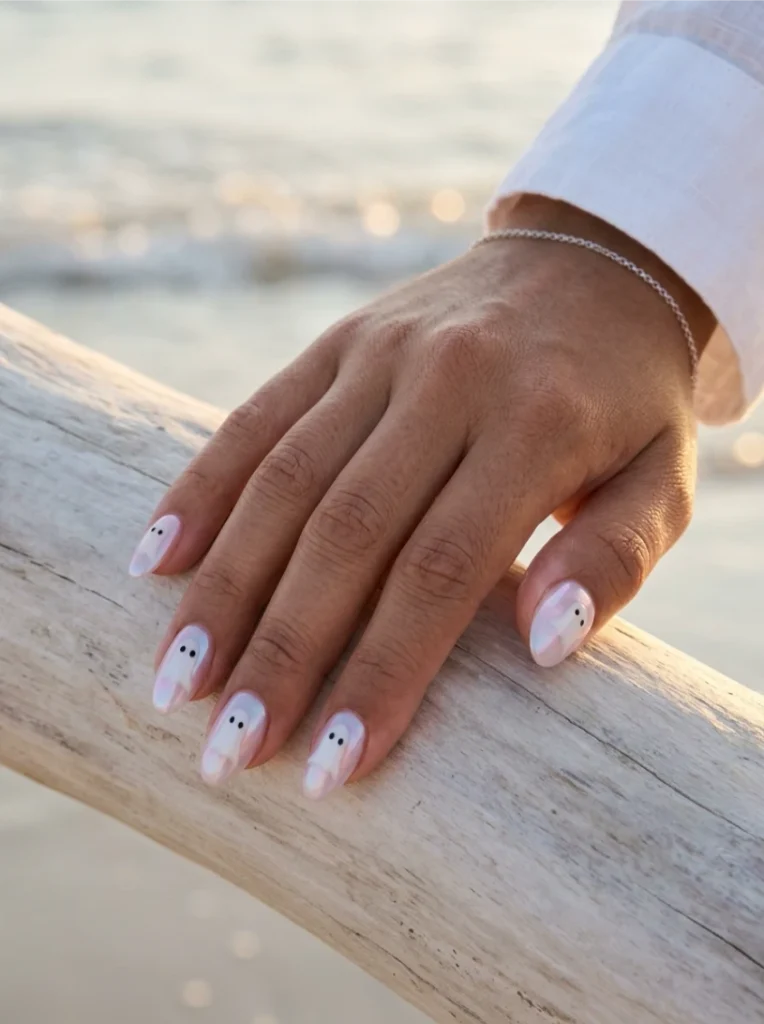
Instead of painting a white ghost, leave the ghost shape as negative space inside a sheer pearl glaze. The glaze covers everything except the outline, so the ghost appears as a soft, milky form hiding under frosted glass.
The only paint is the eyes, two tiny black dots set close together roughly a third of the way down the body. This approach is far more wearable than an opaque cartoon, and it catches window light beautifully because the iridescent pearl shifts between pink and pale blue as your hand moves.
The trade-off is precision. A wobbly vinyl edge shows immediately against a smooth glaze, so cut the ghost shape cleanly and press the edges down firmly before you burnish.
Keep the ghost slightly tapered at the hem, since a perfectly round bottom looks like a balloon rather than a spirit. Seal the whole nail with a clear top coat and the glaze looks like a single glass surface with a ghost sealed inside it.
Technique
Apply the vinyl ghost over a cured, tacky layer, burnish the pearl powder, peel the shape away, then seal everything with clear top coat.
Durability
Burnished powder sealed under top coat wears well, but the clear ghost edge tends to show chips first.
3. Micro Confetti Ghost Nails
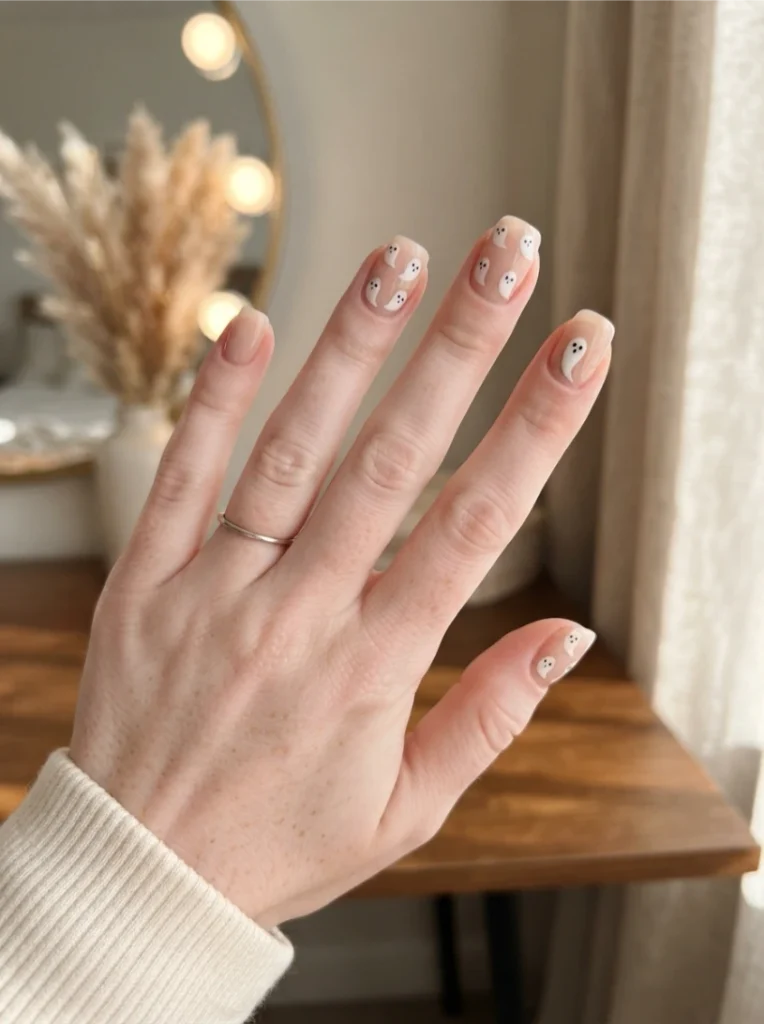
Ghosts under three millimeters wide, scattered in odd numbers across a sheer nude base, read as confetti rather than a themed set. Tilt some left and some right and keep the spacing uneven so the pattern looks casual and tossed instead of stamped.
Paint each body with a fine liner brush and white gel, then add the eyes with the very tip of a dotting tool. The tiny scale also hides a wobbly line, so beginners can get away with more here than on a single large motif.
Vary the count per nail, perhaps three on one and five on another, and leave the thumb nearly bare so the eye has somewhere to rest. Adding a single ghost with a slightly longer tail on the ring finger creates a quiet focal point.
Because nothing is raised, this is one of the safest choices for anyone who works with their hands or types all day.
Nail Shape Match
Short square or squoval nails carry the pattern best, because the flat tip frames the scatter neatly.
Technique
Lift the dotting tool straight up, never sideways, so each eye stays round. A stamping plate also works for the outlines.
4. Scalloped Hem Ghost Nails French Tip
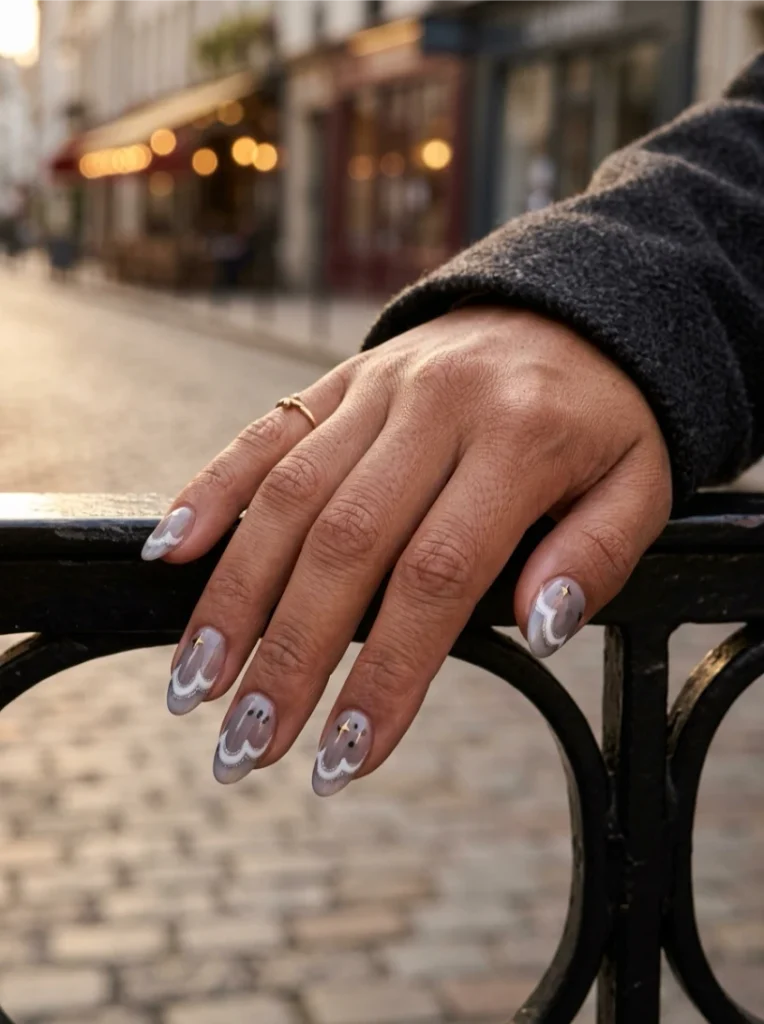
Trade the classic smile line for a scalloped ghost hem, three soft waves of white painted along the free edge with a thin liner brush. Above the waves, a sheer smoke-gray wash gives a night-sky feel, and a fine line of silver glitter tucked under the scallops adds a faint shimmer, like moonlight catching the hem.
Put eyes on only two accent nails and leave the rest as pure hems, so the set reads as a hidden joke instead of a sticker sheet. Add one tiny four-point sparkle near the cuticle on those accent nails, no more than one per nail.
FYI, keep the wave count odd, three or five per nail, because even counts look mechanical and flatten the flowing edge. The idea works best when the smoke wash is truly sheer, since a dense color base hides the scallops and the whole design collapses into a plain dark tip.
Technique
Paint the waves with a striping brush in one continuous back-and-forth stroke rather than three separate arcs, which keeps the hem flowing.
Nail Shape Match
Medium almond and squoval both work well. Extremely short nails cannot fit three full waves cleanly, so use two smaller ones.
Durability
Glitter under top coat can feel gritty at the edge, so seal it with two thin layers rather than one thick one.
See Also: 17 Fall Checkered Nails Ideas That Feel Effortlessly Chic
5. Smoky Spectral Ghost Nails
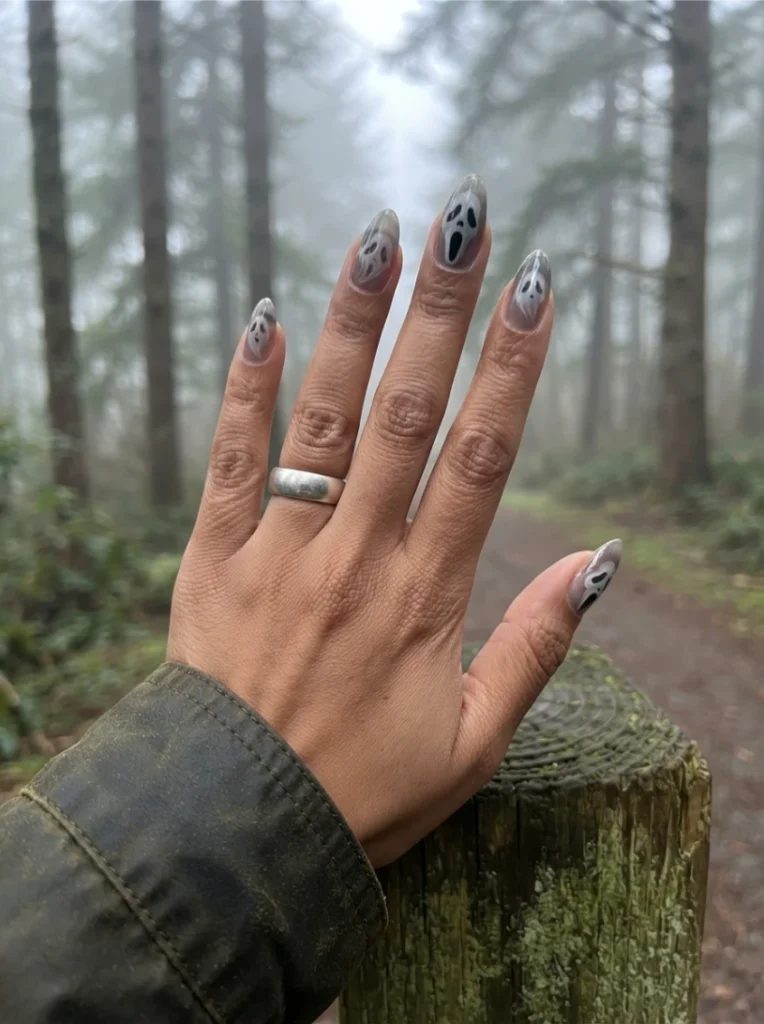
Blooming gel ink pulled across a clear base creates smoky, ghostly wisps that solid paint cannot match. Drop a small bead of ink, let it spread for a few seconds, then drag the edges with a clean brush into a tapered tail so each wisp has a direction.
Add hollow eye sockets and an elongated, open mouth in black, wider than the eyes, to push the face toward frightening. This is the strongest route for a scarier set, because the transparency makes each face look like it is floating up from beneath the surface.
Keep the base a sheer smoky gray rather than opaque black, or the wisps disappear into it. Vary the face size across the hand, with one large screamer on the ring finger and smaller, half-formed faces on the others, so the set feels haunted instead of repeated.
A few pinpoint white highlights on the wisp edges give the ink a wet, ethereal look under the top coat.
Technique
Work one nail at a time and cure between wisps, because ink keeps spreading until the lamp locks it in.
Nail Shape Match
Long almond or stiletto gives the wisps space to trail. On short nails, use one large face per hand.
Durability
Ink sits under the top coat, so the art wears well. The long tip is the weak point, not the design.
6. Single Accent Ghost Nails
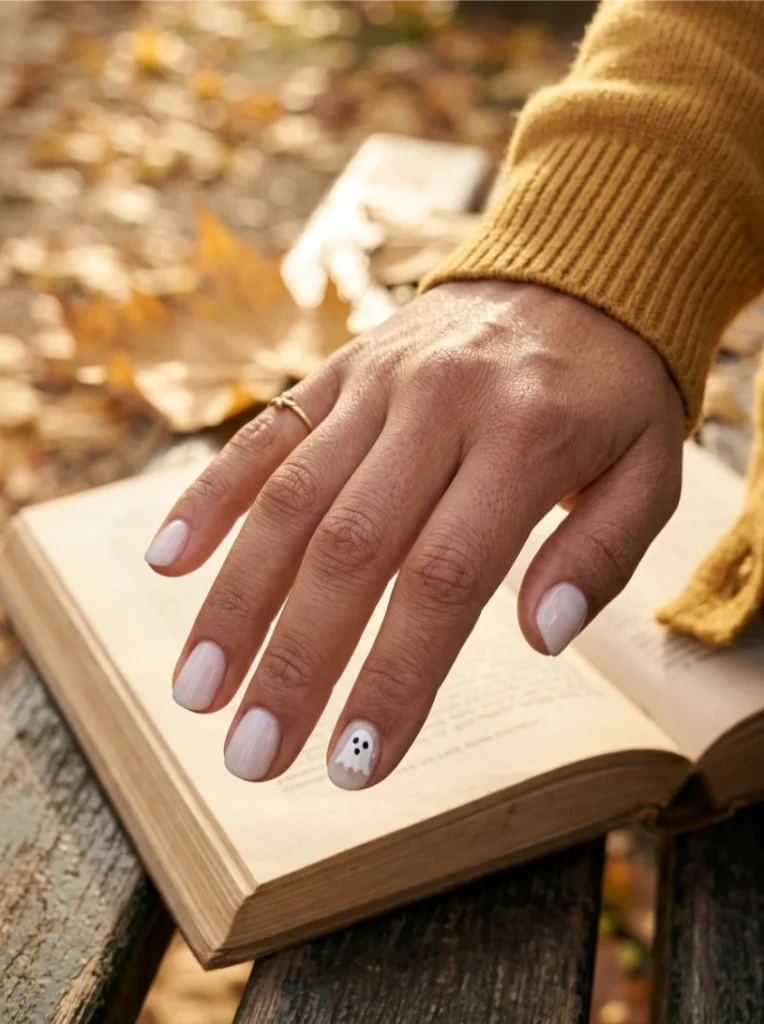
One tiny ghost on the ring finger, with the other nine nails in sheer milky white, is the simplest design here that still looks intentional. Make the ghost smaller than the nail itself and position it off-center toward the free edge, so it has breathing room and the white base can frame it.
IMO this is the look to try first: it needs only a fine brush and a few minutes, and it says Halloween without shouting it. The sheer milk base flatters warm and cool undertones alike, and the restraint makes the single ghost feel like a deliberate signature rather than a leftover from a bigger set.
Tilt the ghost slightly and make one eye a touch larger than the other, for a bit of playful personality. Want a little more? Add a matching micro ghost on the opposite thumb, and stop there.
Nail Shape Match
It works on every shape and is the most forgiving idea here. Short round nails look especially tidy.
Durability
Only one nail carries detail, so if it chips you repaint one nail instead of ten.
7. Glow in the Dark Ghost Nails
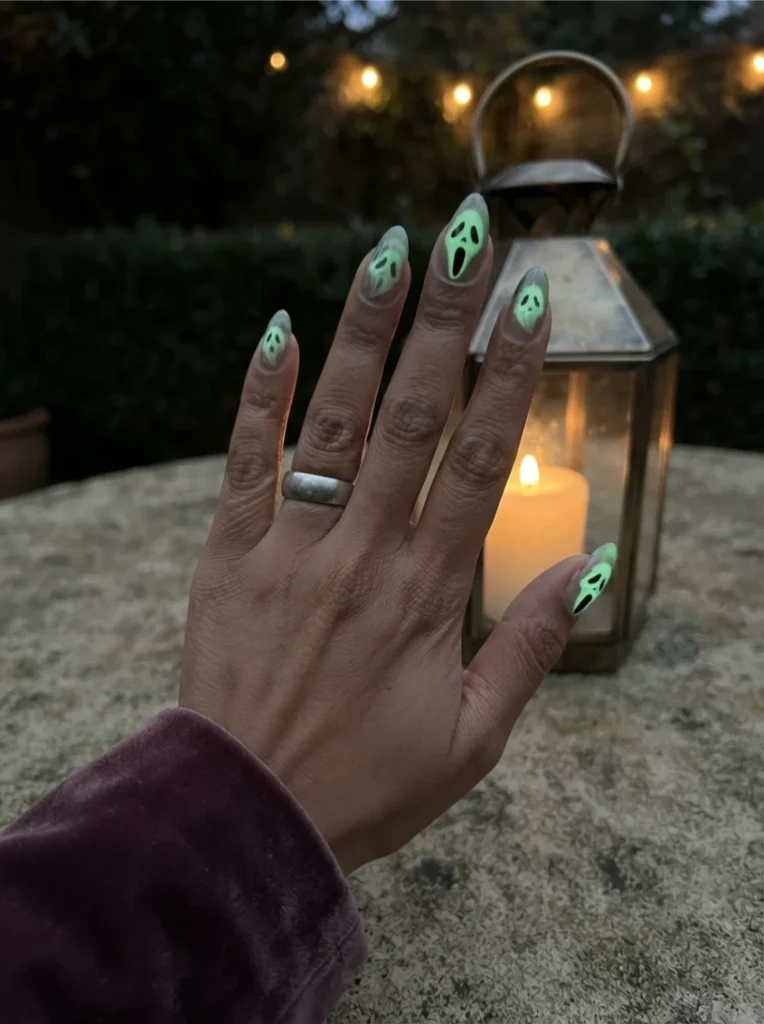
Glow pigment works best in the top layer rather than buried under color, because it charges by absorbing light. Paint the ghost with a glow-reactive white or pale green gel, cover the surrounding nail with a sheer dark gel, and keep the finish clear over the ghost so nothing blocks the charge.
In daylight it looks like an ordinary pale ghost, but in a dark room after a few minutes under a bright lamp it glows a soft green. That reveal is exactly what a photo cannot show, which makes this the most playful pick for night events, costume parties, and anyone who likes a hidden surprise.
Keep the eyes and mouth in opaque black so the face stays readable when the rest of the ghost lights up. Tonal balance matters too: a very dark surround makes the glow look brighter, while a mid-tone surround weakens the contrast and the effect looks washed out.
Technique
Two thin layers of glow gel beat one thick layer, which turns chalky and dull, so cure each layer fully.
Durability
Glow brightness fades over several weeks, usually before the polish itself chips, so treat it as a short-term effect.
8. Smoked Chrome Reversed Ghost Nails
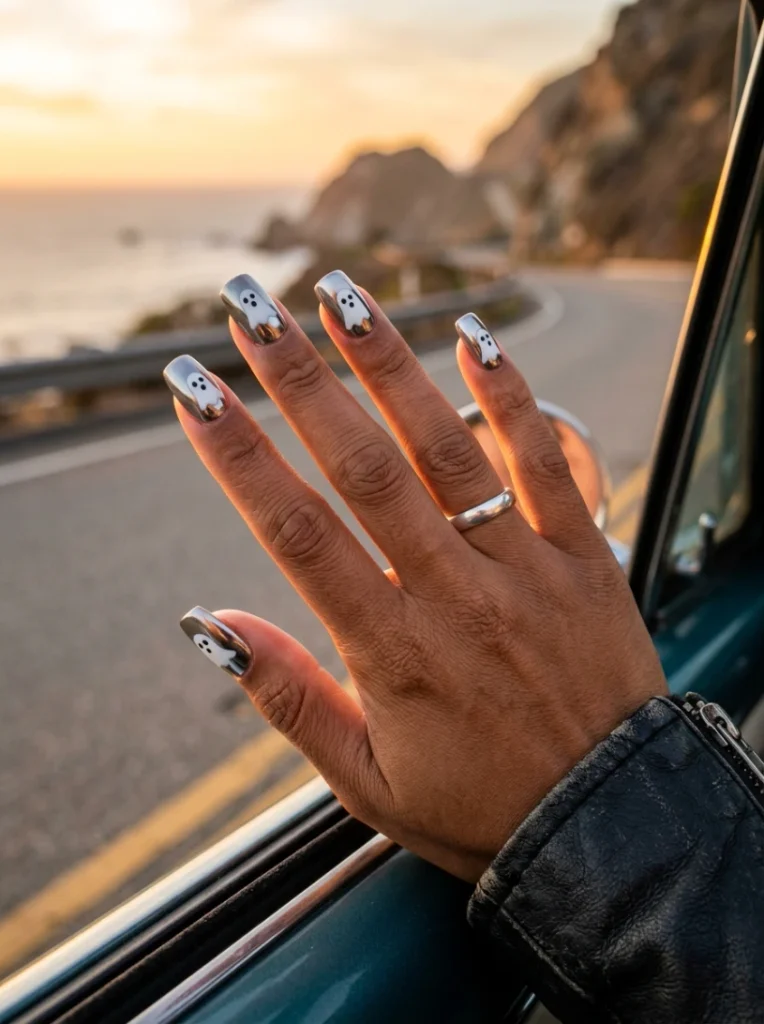
Reverse the usual arrangement by making the ghosts matte and the background mirror chrome. On a smoked silver base, paint each ghost white and cap only the ghost with matte top coat, so it shows as a soft, non-reflective patch set inside a glossy mirror.
The interplay of matte and shine shifts with the angle of the light, and that shifting effect is the entire trick. Eyes are simple black dots, but a matte black rather than a glossy one keeps the face from looking wet against the chrome.
It reads edgier and more grown-up than a pastel ghost, and it pairs sharply with an all-black outfit or silver jewelry.
One limitation to know: chrome shows every fingerprint and uneven layer, so the base has to be perfectly smooth before you burnish. A thin, even coat of chrome powder beats a heavy one, which turns patchy and gray under the lamp.
Nail Shape Match
Squoval and short coffin display the mirror finish evenly. Curved almond distorts reflections slightly, which some people like.
Technique
Burnish over a tacky layer and seal before painting, or the ghost paint can dull the mirror underneath.
9. Twilight Gradient Ghost Nails
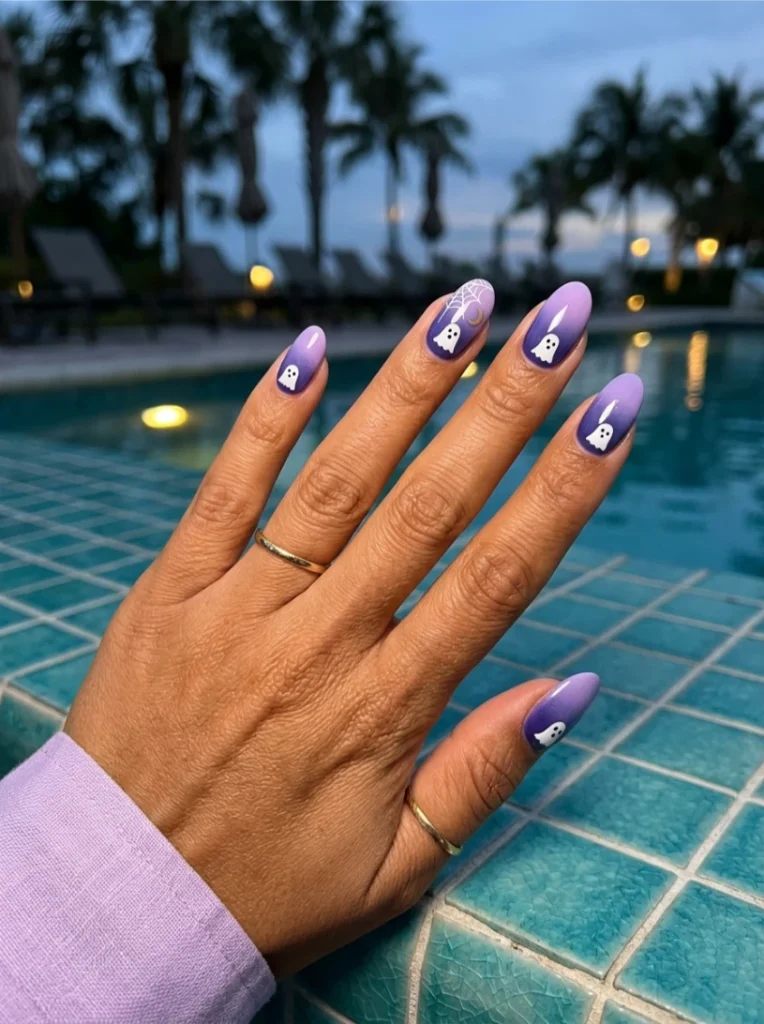
An ombre fade from lavender at the cuticle to deep indigo at the tip sets a twilight sky behind a small ghost and a thin crescent moon. Sponge the colors on in three thin passes and blend the middle band until no line remains, wiping the sponge between colors so the shades stay clean.
Paint one ghost per nail in the lower third, then add a pale gold crescent and a single corner spiderweb in fine white liner on the ring finger only. Against a colored gradient, the ghost’s white body pops harder than it would on a plain base, so keep the ghosts small and let the sky do the talking.
This one suits anyone who prefers soft romantic palettes over the usual black and orange, and the purple range flatters both warm and cool skin. Choose an indigo dark enough to anchor the tip, because a pale gradient loses the night feeling and starts to look like a sunset.
Technique
Paint liquid latex around the cuticle before sponging, so cleanup is quick. Every streak shows once glossy top coat goes on, so blend patiently.
Nail Shape Match
Medium oval or almond gives a tall enough canvas for a true gradient. Very short nails compress it into a two-tone.
10. Blush Cheek Kawaii Ghost Nails
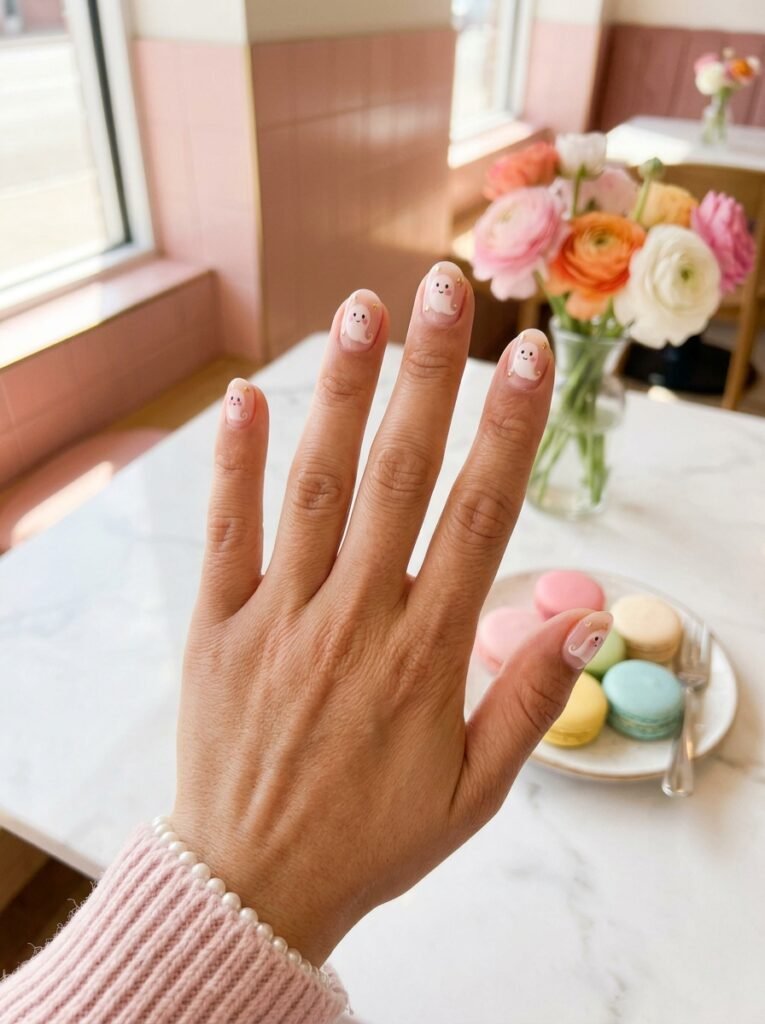
Two pink blush dots and a tiny smile turn the standard ghost into a kawaii character. Use a pale pink base, a marshmallow-white ghost with a soft outline, and rose cheeks dabbed on with a nearly dry brush so the color melts into the white instead of sitting on top of it.
Add a few micro star studs around the character if you like, but stay at three, because crowding turns the cute look messy. Keep the mouth to a small curve, since an open O immediately reads as scary and undoes the sweetness.
Give the ghost a slightly tilted head and a tiny curl at the hem so it feels like it is waving. It is the sweetest end of the range and suits anyone whose goal is cute rather than creepy, and it pairs well with pastel outfits and pearl jewelry.
Because the pink base is sheer, it also grows out gracefully, which matters if you like a set to last a couple of weeks.
Nail Shape Match
Short round or squoval nails work well, because the character’s scale stays intact. On long nails, enlarge the ghost instead of adding more.
Technique
Dab cheek color onto the cured ghost and soften the edges so it looks like blush, not a sticker.
Read More: 20 Fall Polka Dot Nails Ideas That Feel Effortlessly Chic
11. Peekaboo Fog Ghost Nails
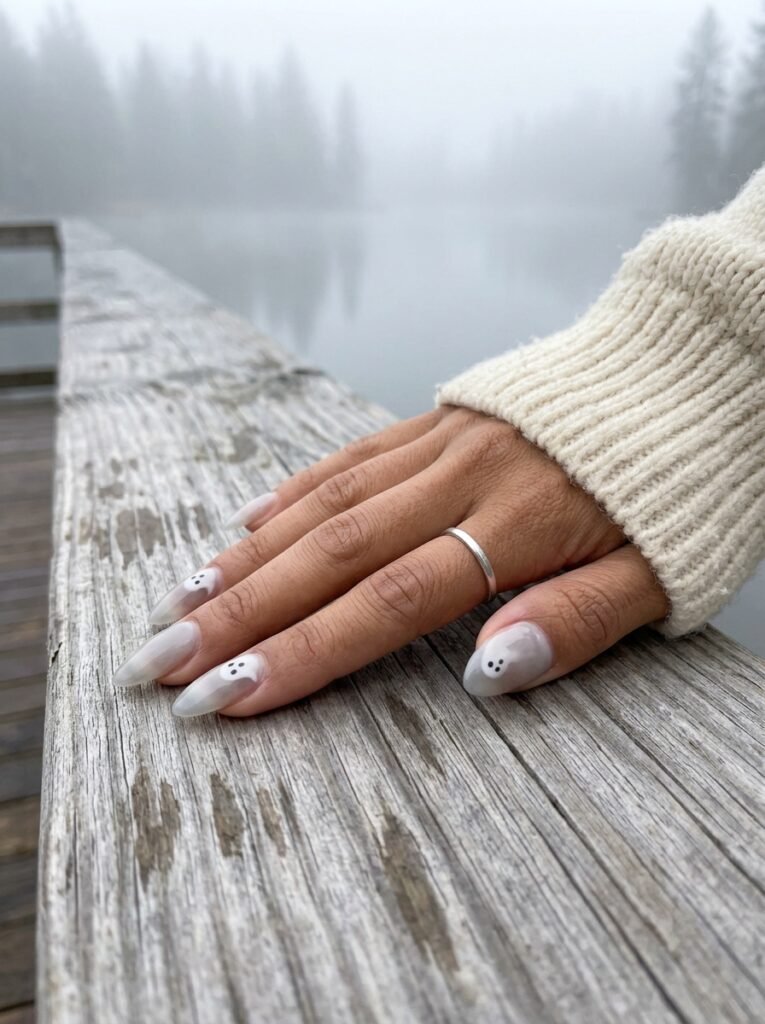
Placing the ghost’s head at the cuticle edge, as though it is peering into the frame, is the unexpected variation most posts skip. Sponge translucent gray-white from the free edge inward, so the lower half of the ghost dissolves into mist rather than ending in a crisp hem.
Two nails per hand carry a ghost and the rest carry fog alone, so the story unfolds across the whole set instead of on one nail. Painting the ghost in the opposite direction from usual is exactly why it looks so different from every other design on this list.
Sponge the fog first, cure it, then paint the face on top so the features stay crisp and dark against the haze. It suits anyone who likes moody, atmospheric nails over cartoonish ones.
It does need some length to read, since the fog requires room to fade before the eye catches it.
Nail Shape Match
Long almond or oval nails work best, so the fog has room to fade and the ghost head still sits clearly at the cuticle.
Technique
Dab the sponge from the free edge inward with almost no pressure, so the mist fades gradually instead of stopping at a hard line.
12. Coquette Bow Ghost Nails
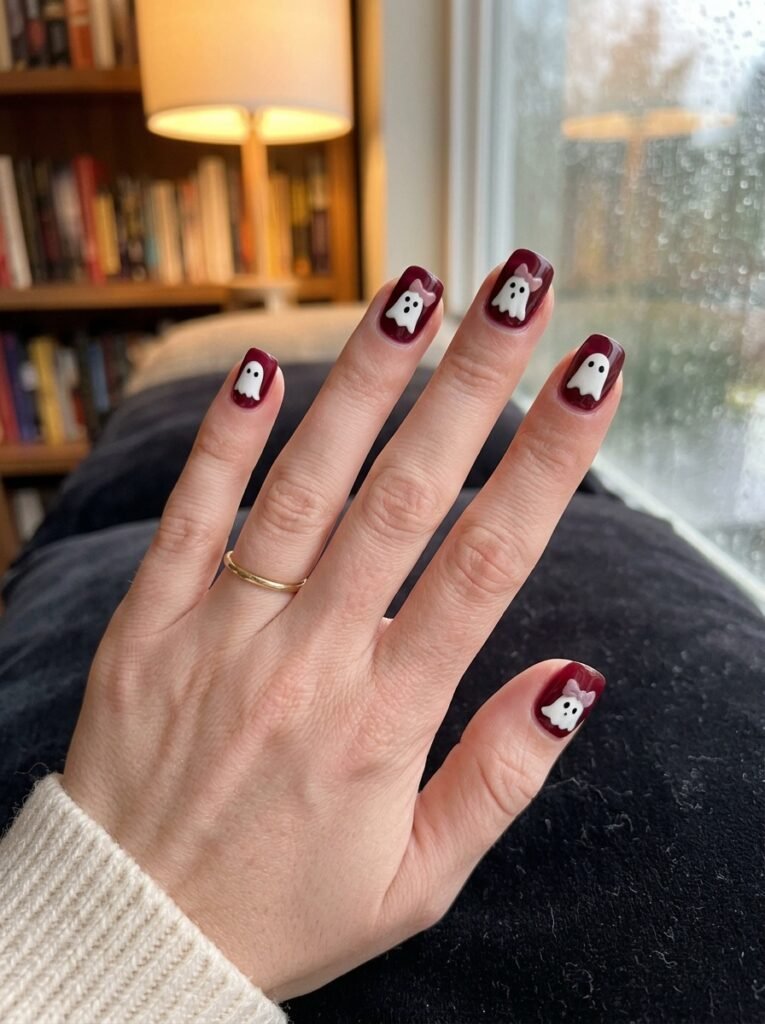
Adding a tiny bow to the ghost’s head turns a spooky motif into a coquette one. Use a deep burgundy jelly base, a white ghost, and a pink bow made of two teardrops and a center dot, drawn with a fine liner brush.
The dark base makes the pastel bow stand out, which is why the palette works so well. It bridges Halloween and romantic styling, so the set stays wearable well past October, and it pairs nicely with soft knits and gold jewelry.
Draw the bow slightly off-center and tilted so it looks like it slid sideways, which adds charm. The catch is scale: a wobbly bow reads as a smudge, so a steady hand matters, and you should paint the bow before the ghost’s eyes so you can adjust proportions.
Keep the pink a dusty rose instead of bubblegum, because it blends more softly with the burgundy and keeps the look grown-up. Limit the bow to three or four nails so the set stays elegant rather than crowded.
Nail Shape Match
Short to medium squoval or almond keeps the bow large enough to paint cleanly. Very short nails leave little room for the loops.
Durability
Fine liner details under top coat hold up well, though soft pink can fade slightly against a dark base over time.
Hand-Painted, Sculpted, or Finish-Led: Which Build Suits You?
Every one of the ghost nails designs below falls into one of three approaches, and the approach decides how hard the set is to pull off.
- Hand-painted: The most flexible route. It needs a fine brush, gel polish in a few shades, and a steady hand, and covers ideas 3, 4, 6, 10, and 12.
- Sculpted 3D: The most dramatic. It needs builder gel and practice, and it is idea 1 only.
- Finish-led: The surface around the ghost matters as much as the ghost (pearl, ink, glow, chrome, gradient, fog). This covers ideas 2, 5, 7, 8, 9, and 11.
If you are new to nail art, start hand-painted. Sculpted and chrome sets are the hardest to DIY, so leave those to a nail technician or try press-on nails as a shortcut.
The Mistake That Ruins Most Ghost Nails
Ghost size and eye placement cause most failures. A ghost that fills the entire nail loses its silhouette and becomes a white patch, so leave visible base color around it.
Eyes placed too high or too wide make it look startled rather than spooky or sweet. Aim for the upper third of the ghost body, spaced about one eye-width apart.
Skipped nail prep is a close second. Buff the surface lightly and apply a thin base coat, or fine details lift at the edges within days. Not sure where to start? Use the ring finger as a test nail.
Who These Ghost Nails Actually Suit
Sheer pearl and milky bases flatter nearly every skin tone, because they soften instead of contrast. Opaque white ghosts look striking on deeper skin, but a sheer white base can turn chalky, so choose a pink-beige sheer instead.
Short nails handle ideas 3, 6, 10, and 12 best, while sculpted, smoky, and fog looks need length to breathe. If you type or work with your hands all day, the flat-painted ideas are the practical choice.
Quick Comparison
| Design Name | Best Shape | Durability | Technique |
|---|---|---|---|
| Sculpted Drape | Long almond | Moderate, snags easily | 3D gel sculpting |
| Glazed Pearl | Almond, oval | High | Vinyl mask, pearl powder |
| Micro Confetti | Short square | High | Fine liner dots |
| Scalloped Hem French Tip | Medium almond | High, seal glitter well | Freehand wave stroke |
| Smoky Spectral | Long almond | High under top coat | Blooming gel ink |
| Single Accent | Any shape | Very high | One freehand ghost |
| Glow in the Dark | Almond, squoval | Moderate, glow fades | Thin glow layers |
| Smoked Chrome Reversed | Squoval, short coffin | High | Chrome plus matte |
| Twilight Gradient | Medium oval | High | Sponge gradient |
| Blush Cheek Kawaii | Short round | High | Dry brush blush |
| Peekaboo Fog | Long oval | High | Sponged fog |
| Coquette Bow | Short to medium | High | Fine liner bow |
FAQ
Are ghost nails simple enough for a beginner to do at home?
Yes, the single accent look is the easiest starting point. It needs one fine brush and one small ghost, and a mistake only costs you one nail.
Can you wear ghost nails short, or do they need length?
Short nails work well with micro confetti, the single accent, blush cheek, and coquette bow looks. Skip the sculpted and smoky styles, which need length.
How do I make ghost nails scary instead of cute?
Use hollow, elongated eyes and a wide open mouth. Set the ghost on a sheer smoky gray base and let the hem look ragged rather than neat.
What colors pair with ghost nails besides black and white?
Lavender, burgundy, blush pink, smoke gray, and pale gold all work. Burgundy doubles as a classic fall nails shade, and a tiny orange pumpkin on one accent nail adds a traditional touch. Deep bases make white ghosts pop, while pastel bases keep them soft.
How many nails should I put a ghost on?
Two or three accent nails usually look most polished. Use ghosts on every nail only when they are tiny, as in the confetti style.
The Ghost That Outlasts October
A ghost is really just a shape with two dots, so what makes your ghost nails memorable is everything around them: the finish, the base, the scale.
If you save only one idea, choose the one you will actually wear on a random Tuesday, not just on the 31st. The best Halloween manicures make people look twice, then smile.


Pingback: 20 Stunning Halloween Nails Ideas Worth Pinning This Year - Glow Vibes Spot