Acrylic nails use a liquid-and-powder overlay to build length, shape, and durable structure that gel or dip powder can’t match. These 18 acrylic nails ideas for 2026 range from checkerboard French tips to full encapsulated florals, each one a statement design rather than a basic manicure. Best for anyone who wants long-lasting, salon-level nail art with real dimension and texture.
Whether you’ve been searching for simple acrylic nail ideas or scrolling for something more elaborate, this roundup of acrylic nail ideas for 2026 skews toward the more detailed end on purpose. The designs below lean into the techniques that actually separate a forgettable set from one you screenshot and bring straight to your nail tech: sculpted 3D work, chrome finishes, encapsulated objects, and hand-painted detail. Here’s where to start.
1. Checkerboard French Acrylic Nails With 3D Bow Charms
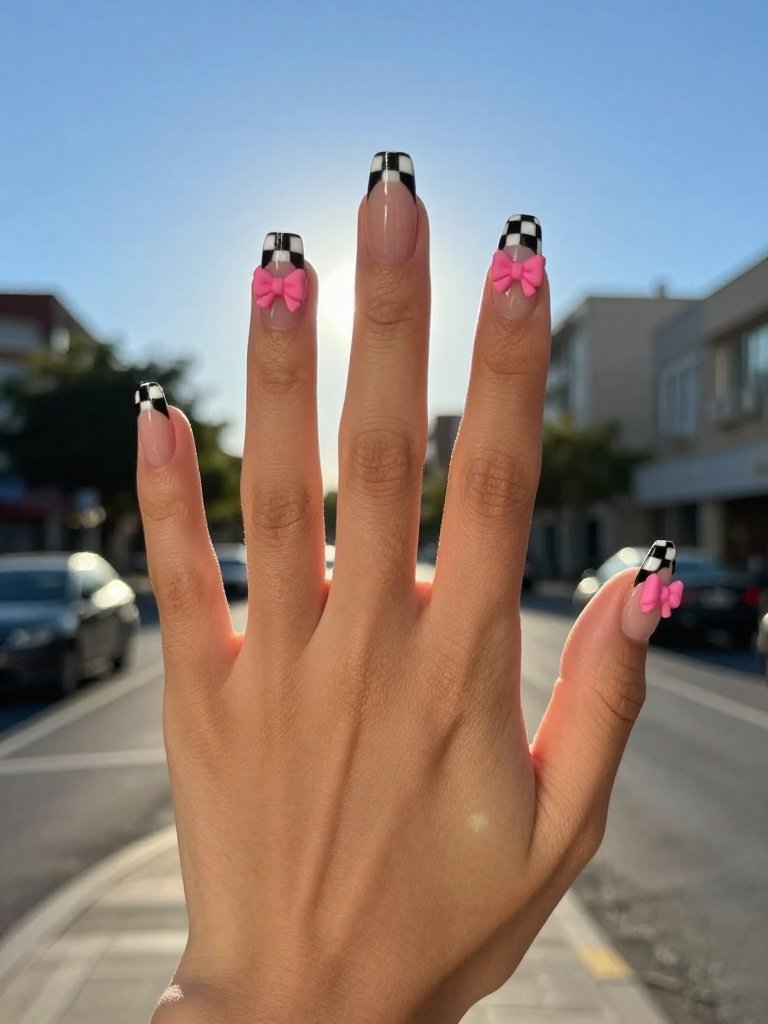
This design pairs a sharp black-and-white checkerboard pattern along elongated coffin tips with soft pink 3D bow appliqués sculpted directly onto the nail bed. The checkerboard isn’t painted freehand square by square. It’s built using thin striping tape laid in a grid over the clear tip before the black polish or gel paint fills each alternating square, which is what keeps the lines so crisp at this length. Proper nail prep matters more than usual here, since any oil left on the nail bed will keep the striping tape from sitting flat. The bows sit slightly raised off the nail surface, giving the whole set real texture instead of a flat printed look.
Tip
- Ask your nail tech specifically for “striping tape checkerboard,” not hand-painted, since taped grids stay far straighter on long coffin tips.
- Request the bows in a matte or cream gel rather than glossy, which keeps them from looking like stickers under a topcoat.
- Skip this design if you type a lot for work. The extended coffin length and raised bow detail make the tips prone to catching on keyboards.
- Have your tech seal the bow edges with an extra layer of clear builder gel so they don’t lift or snag first.
Nail Shape Match
This pairing was built for long coffin or long square nails, since the checkerboard grid needs surface area to read clearly and isn’t worth attempting on a short or round shape.
2. Diagonal Glitter French Acrylic Nails
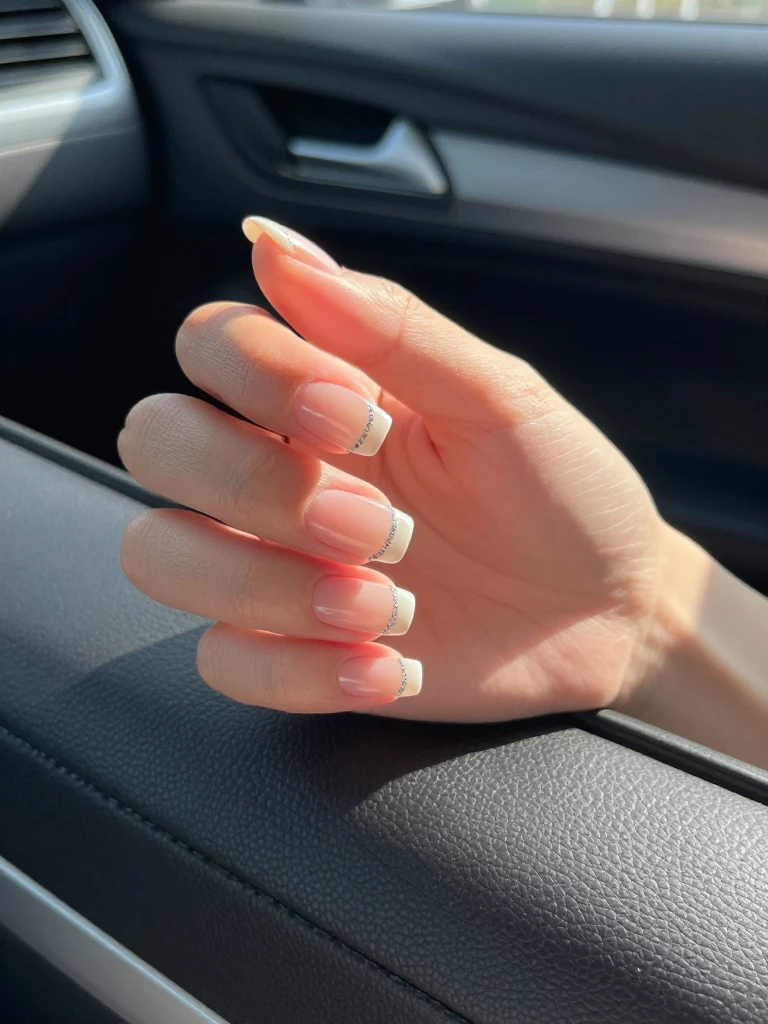
Instead of a straight horizontal French line, this version runs a single diagonal streak of fine silver glitter from the cuticle edge to the tip, splitting a soft white French into two clean sections. The glitter isn’t scattered across the whole nail. It’s confined to that one diagonal band, which is what keeps the look elegant instead of busy and makes it one of the classier acrylic nail designs with glitter you’ll come across right now. The white tip itself stays sheer and milky rather than opaque, so the pink of the natural nail bed still shows through underneath.
Tip
- Ask for “encapsulated glitter placement,” where the glitter is sealed between two clear gel layers so it doesn’t feel gritty or catch on fabric.
- Request a fine, not chunky, glitter for the diagonal line. Chunky glitter breaks up the clean angle and looks messier at a distance.
- The most common mistake here is letting the white tip go fully opaque. Ask specifically for a sheer, buildable white so the design reads as soft rather than stark.
Nail Shape Match
This falls solidly among the medium length acrylic nail ideas that shapes like coffin or square handle best, since there’s enough room at that length for the diagonal line to sit at a clean, readable angle.
3. Milky Lilac Acrylic Nails With Pressed Flower Accents
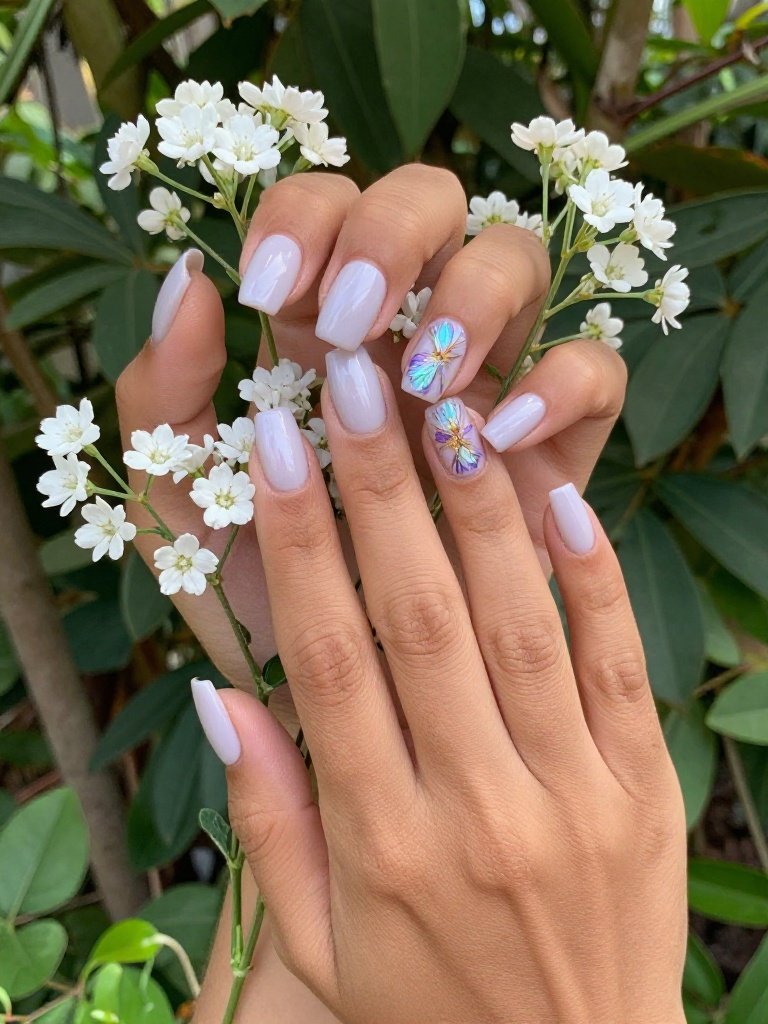
This set keeps most nails a soft, milky lavender-white base and reserves the detail for one or two accent nails filled with real pressed dried flowers and iridescent butterfly foil, all sealed under a thick, glossy topcoat. The milky base isn’t a solid pastel polish. It’s built with a sheer white-lavender acrylic powder that lets a little translucency show through, which gives it that soft, almost glass-like quality rather than a flat, chalky finish. It’s a genuinely cute acrylic nail design that still feels current without going into full color, and the florals sit suspended inside the clear layer of the accent nails like tiny preserved specimens.
Tip
- Ask your tech to place the pressed flowers on your ring finger only if you want a subtler version, since one accent nail reads as intentional rather than busy.
- Request “encapsulated pressed florals,” specifically, so the tech knows to embed real dried flowers under gel rather than using printed flower decals.
- A genuinely current pick for anyone who wants texture and dimension without going into full color, and one of the easier entries on this list to point most people toward first.
- Avoid picking flowers with thick stems or dense petals. Flat, delicate blooms like baby’s breath or small pressed pansies encapsulate far more cleanly.
Nail Shape Match
The milky base and floral accents suit medium square or squoval nails best, giving the pressed botanicals enough flat space to sit centered without warping around a curve.
4. Chrome Mirror Aura Acrylic Nails
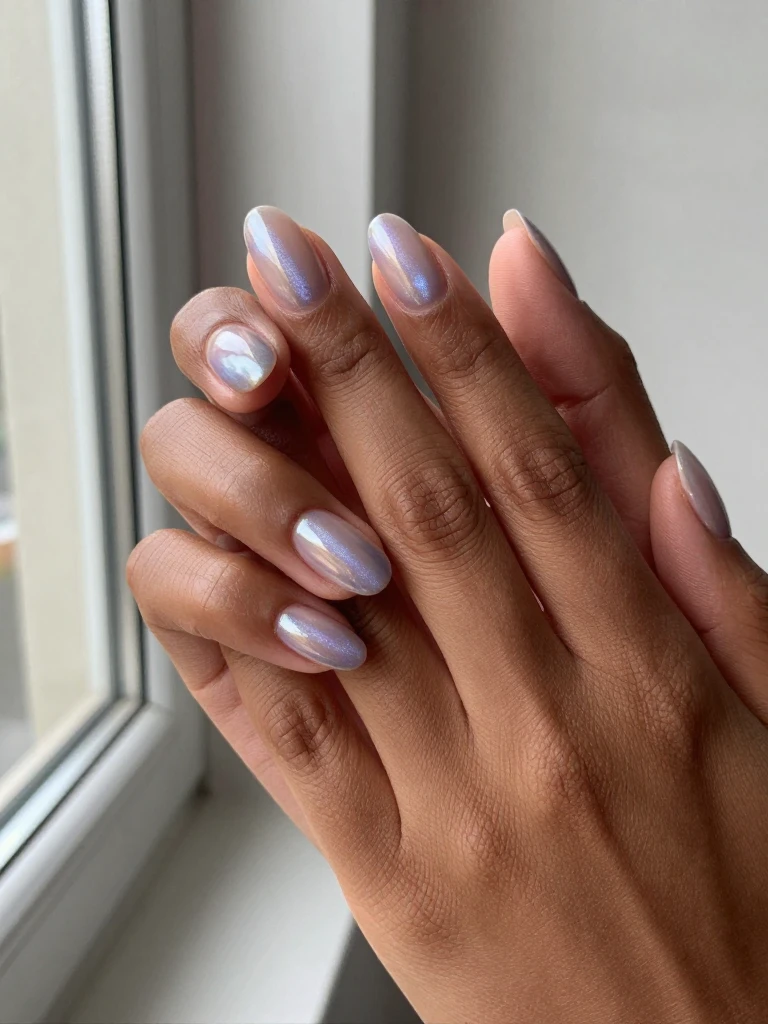
Aura nails use an airbrushed gradient of chrome pigment, usually silver, lavender, or icy blue, blurred outward from a central point on an otherwise bare or milky nail, creating a soft halo effect rather than a hard-edged design. The chrome pigment is buffed on dry over a tacky hard gel base using a small sponge applicator, not painted with a brush, which is what gives it that soft, cloud-like blur instead of a sharp shape.
Tip
- Ask for “chrome powder aura technique,” specifically, since the effect depends entirely on the pigment application method, not the polish color itself.
- Request a matte top layer over just the outer edge of the chrome bloom if you want the blur to look even softer and less mirror-like.
- The number one thing that ruins this look is applying chrome powder over glossy gel instead of a tacky, unset base, since it won’t adhere evenly.
- Keep the rest of the nail bare or a single sheer shade. Adding extra art competes with the chrome and flattens the effect.
Nail Shape Match
Chrome aura shows up best on medium almond or oval nails, where the curved surface helps the gradient blur look naturally soft rather than boxed in.
5. Sculpted 3D Floral Acrylic Nails
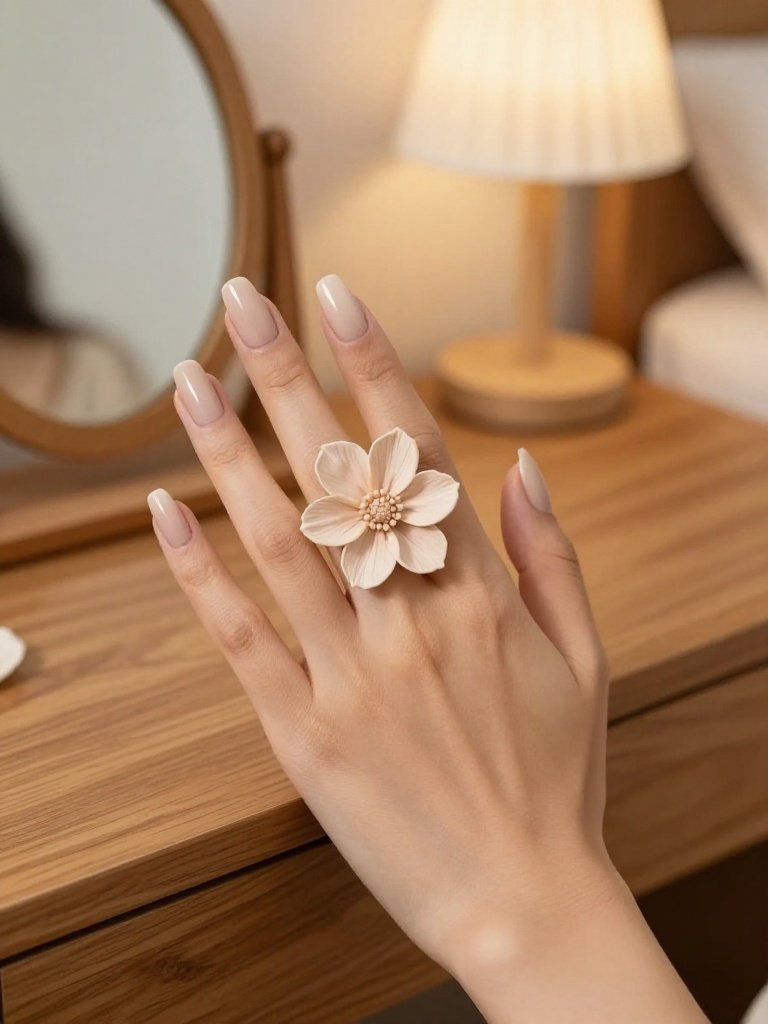
This technique builds actual raised flowers directly out of acrylic powder and liquid monomer on the nail surface, layering petal by petal with a small sculpting nail art brush until the bloom has real height and shadow, not just a painted outline. It’s genuinely closer to sculpture than nail art, since the tech works the acrylic while it’s still pliable to shape individual petals against the natural nail bed before it hardens.
Tip
- Confirm your tech does 3D sculpting specifically, since it’s a distinct skill from flat nail art and not every acrylic salon offers it.
- Ask for the flowers placed only on the ring finger or as a single accent nail, since a full set of raised 3D flowers adds noticeable bulk and weight.
- Request a slightly shorter overall nail length to offset the added height from the sculpted petals, or the proportions can start to look top-heavy.
Nail Shape Match
Best suited to short or medium coffin nails, where the added dimension of the sculpted petals doesn’t compete with an already-long tip.
6. Marbled French Acrylic Nails With Gold Veining
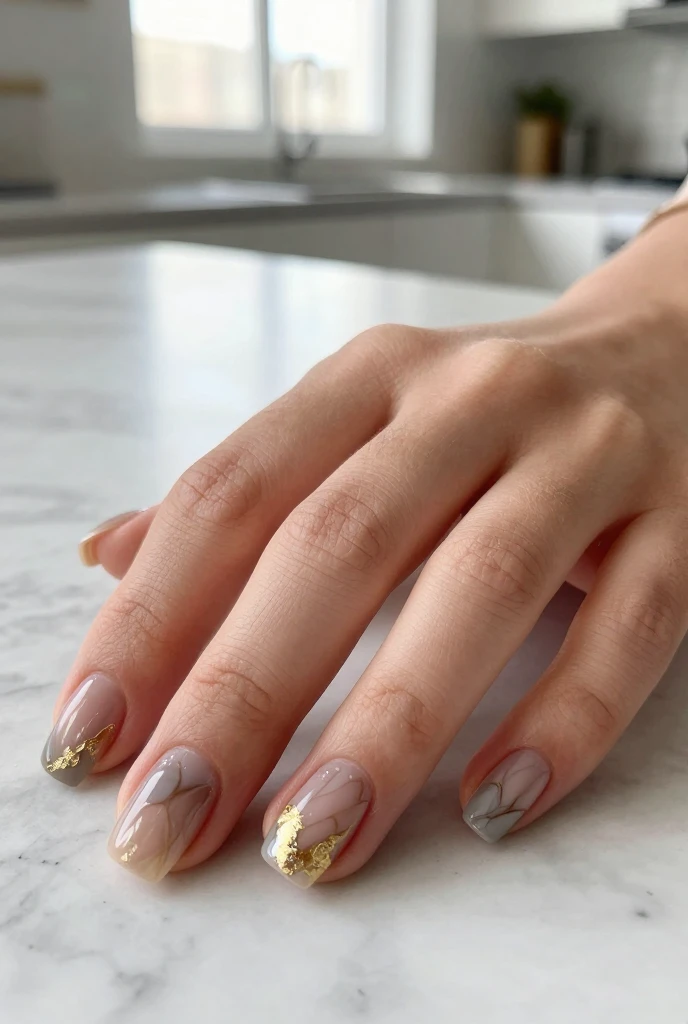
Two or three complementary polish shades swirl together in a loose marble pattern confined to the French tip section over a smooth acrylic overlay, then thin gold foil veining traces through the swirl for a stone-like finish. The marbling happens using a technique called water marbling or a dotting tool drag, similar in spirit to a baby boomer French but far less uniform, where wet polish colors are pulled through each other before they set, so no two nails in the set end up with an identical pattern. It’s one of the more classy acrylic nail designs on this list precisely because the pattern never repeats exactly.
Tip
- Ask for “gold leaf veining over marble,” which is applied with tweezers after the marble sets, rather than painted-on gold lines that tend to look flatter.
- Request the marble confined to just the tip area if you want the design to still read as a French manicure from a distance.
- One real trade-off with this look: because the marble pattern is never identical nail to nail, it’s harder to get a perfectly symmetrical set compared to a solid color.
- Choose complementary rather than clashing polish colors, like taupe and rose gold, so the marbled effect looks cohesive instead of muddy.
Nail Shape Match
Works well on medium square or coffin nails, giving the marble swirl enough flat surface at the tip to develop real depth.
See Also: 14 Teal Nails Ideas That Are Secretly Easy to Recreate
7. Cat-Eye Magnetic Ombre Acrylic Nails
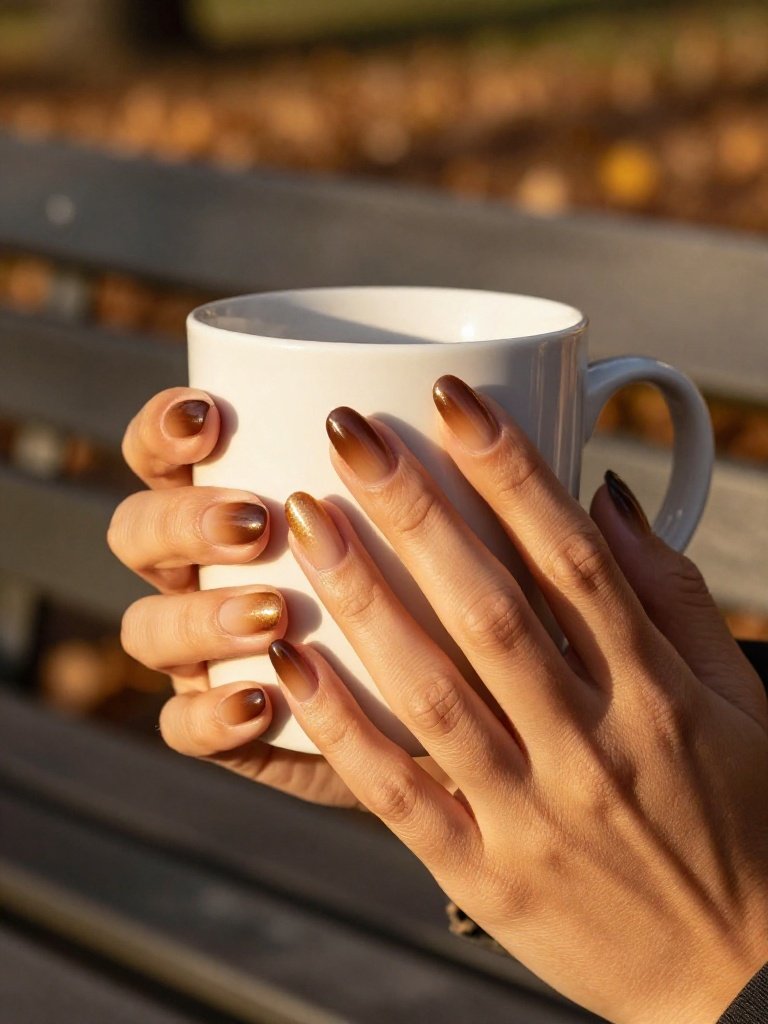
This uses a magnetic gel-acrylic hybrid polish embedded with metallic particles that a magnet pulls into a glowing line across the nail before curing under a UV or LED lamp, creating a light-catching stripe that shifts as your hand moves, layered here in an ombre fade from deep espresso at the cuticle to soft caramel at the tip. The magnet is held over the wet polish for several seconds before the gel sets, which locks the particle pattern in place permanently.
Tip
- Ask specifically for “cat-eye magnetic gel over acrylic base,” since this only works with a magnetic-infused polish formula, not a standard shimmer.
- Request the magnet passed at a slight diagonal rather than straight across for a more dynamic light line instead of a flat stripe.
- Skipping the final high-gloss seal is the most common mistake, since the magnetic effect looks muted without a glassy topcoat locking it in.
- Choose a magnet with multiple strength lines rather than a single flat magnet, since it creates more dimension in the light stripe.
- Ask for the darkest shade placed at the cuticle and the lightest at the tip so the ombre fade reads naturally underneath the cat-eye shimmer.
Nail Shape Match
This ombre suits almond or medium coffin shapes especially well, since the curved tip helps the light-catching stripe shift more visibly as your hand turns.
8. Airbrushed Sunset Acrylic Nails With Abstract Line Art
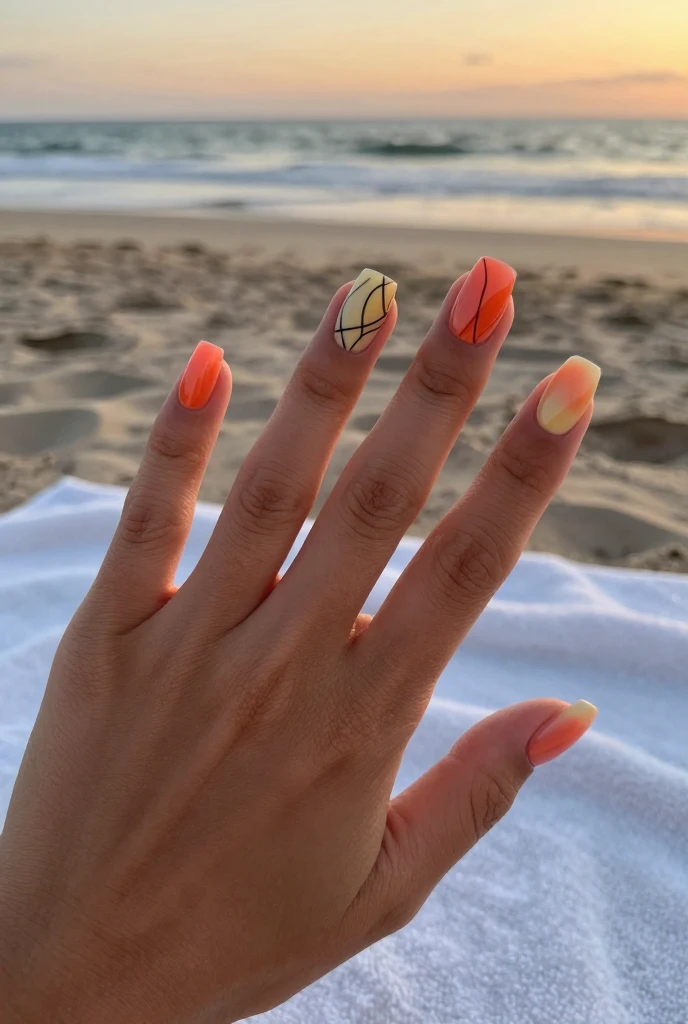
A soft gradient airbrushed in warm coral, orange, and pale yellow mimics a sunset across the base of the nail, with thin black abstract line art, think loose swirls or a single continuous squiggle, drawn over the top in gel paint once the gradient cures. The airbrush gun sprays a fine, even mist that blends colors with none of the visible brush strokes hand-blending would leave behind, and clean tip blending is what keeps the gradient looking soft instead of banded.
Tip
- Ask if your salon has an airbrush station specifically, since this gradient technique requires equipment a lot of smaller salons don’t stock.
- Request the line art in a fine detail gel brush, not a striping brush, for thinner, more precise lines over the gradient.
- Consider a matte topcoat on just one or two accent nails to break up the glossy finish and make the line art pop more.
Nail Shape Match
Best on medium square nails, where the flat, wide surface gives the airbrushed gradient room to blend smoothly without pooling at the edges.
9. Full Encapsulated Botanical Acrylic Nails
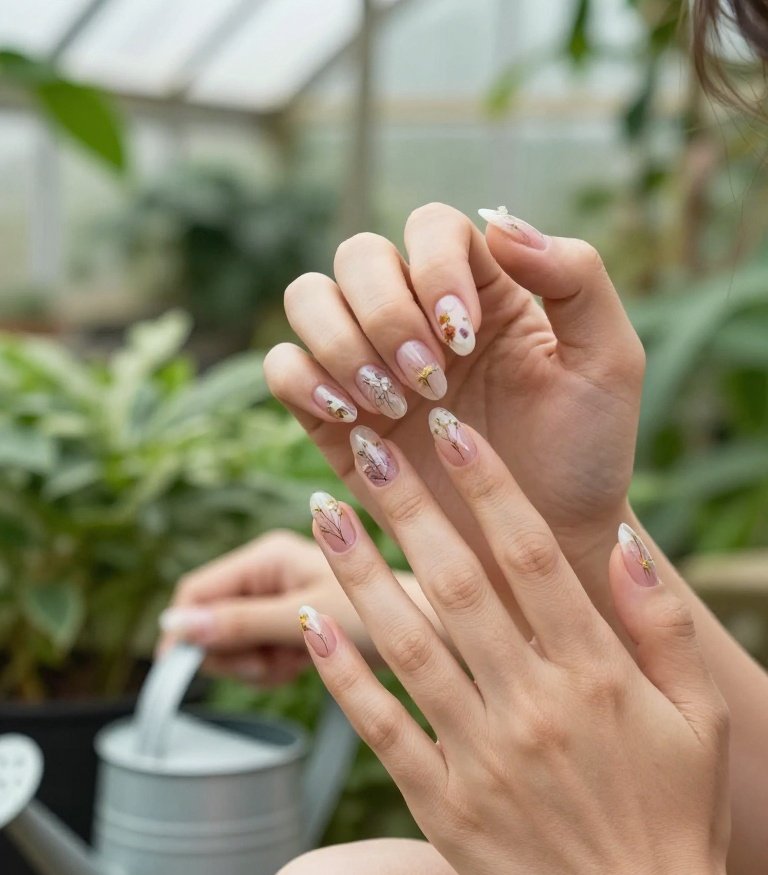
Unlike an accent-nail-only floral look, this set embeds pressed dried flowers, baby’s breath, or thin leaf fragments across every nail, sealed under clear builder gel so the entire hand reads as one cohesive pressed-botanical design rather than a single highlight nail. Building this set takes noticeably longer in the chair since each nail is layered individually over custom nail forms: base color, then the flower placement, then a careful clear seal to avoid trapping air bubbles or causing later product lifting around the petals.
Tip
- Ask your tech to seal each flower with a thin gel layer before the final topcoat, which prevents visible air bubbles from forming around the petals.
- Choose flat, low-profile botanicals like baby’s breath over anything with bulk, since thicker flowers are more likely to shift during the sealing step.
- Budget extra time for this appointment. A full ten-nail encapsulated floral set genuinely takes longer than most other designs on this list.
- Ask for a slightly thicker topcoat seal on the nails you use most, like your thumb and index finger, since those see the most daily wear.
Nail Shape Match
Squoval or medium square nails give each pressed flower the flattest possible surface, which keeps the encapsulation from warping the botanical shape.
10. Rhinestone Statement Accent Acrylic Nails
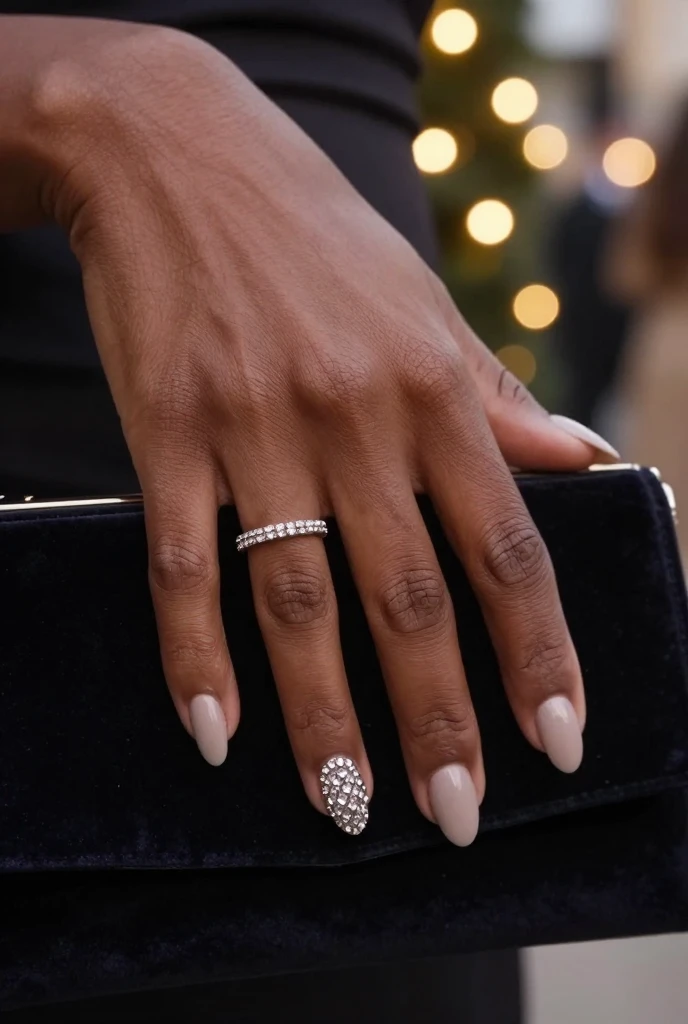
The rest of the set stays a clean, solid neutral, while a single accent nail, usually the ring finger, gets densely covered in graduated rhinestones set edge to edge, largest stones near the cuticle tapering to the smallest near the tip. Each stone is placed individually with a wax pencil and set into a bed of clear gel before curing, after the nail has been shaped with an e-file to keep the surface perfectly smooth, which is what keeps a fully rhinestone-covered nail from looking clumped or uneven.
Tip
- Say “graduated rhinestone placement” to your tech specifically, so the stones taper in size rather than getting scattered randomly across the nail.
- Ask for flatback crystals rather than domed ones on this accent nail, since flatbacks sit lower and are less likely to snag or pop off.
- The real trade-off here is durability. A heavily stoned accent nail is more delicate day to day than the rest of a plain set.
Nail Shape Match
This statement nail works on almost any medium-length shape, though almond and coffin let the graduated taper follow the nail’s natural curve most smoothly.
11. Negative Space Geometric Acrylic Nails
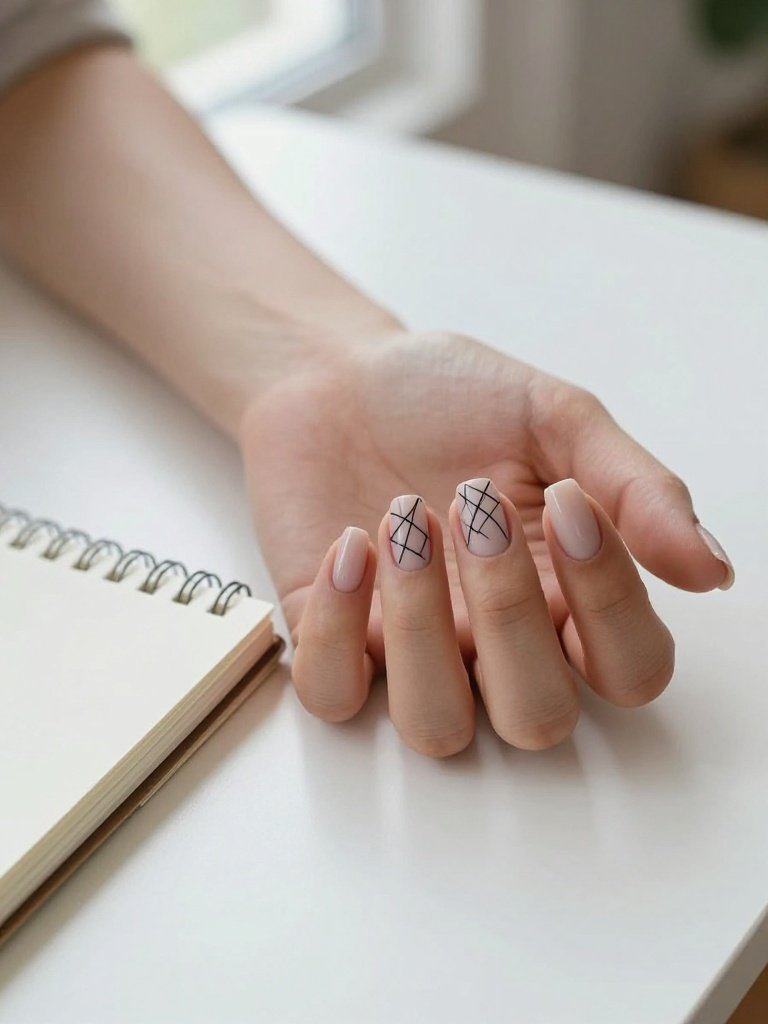
Thin, precise black lines form an angular geometric pattern, think overlapping triangles or a single broken grid, drawn directly onto bare, unpainted nail so the natural nail color shows through every gap in the design. The lines are drawn freehand or with a striping brush loaded with gel paint, and because there’s no base color to hide behind, any shaky line is immediately visible, which makes this one of the more technically demanding looks on this list.
Tip
- Ask your tech if they specialize in freehand line work before booking, since negative space designs show every imperfection with nothing to cover it.
- Request a very fine detail brush, sometimes labeled a 5/0 or smaller, for the thinnest, most precise geometric lines.
- Keep the rest of your hand minimal, no rings or heavy jewelry, since the negative space design already reads as a strong statement on its own.
Nail Shape Match
Best suited to squoval or short-to-medium square nails, where a flatter surface keeps the geometric lines straighter and easier to read.
12. Two-Tone Split French Acrylic Nails
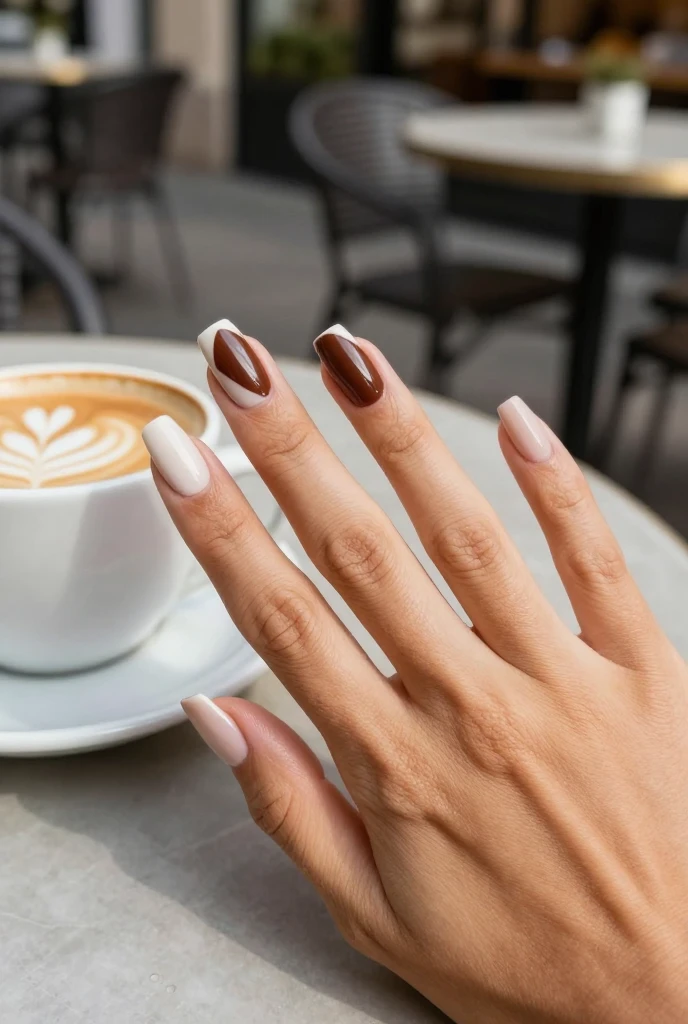
The tip splits diagonally or vertically into two contrasting colors here, like a milky white paired with a rich chocolate brown, instead of one uniform French line, creating a color-blocked effect at the free edge. Unlike a dip powder manicure, which builds color in dipped layers, these acrylic extensions let a tech mask off the split line with thin tape before each color is applied separately, which is what keeps the division between the two shades so clean and geometric.
Tip
- Ask for the split placed vertically down the center of the tip rather than diagonally if you want a more graphic, symmetrical look.
- Request low-tack nail vinyls specifically for masking the split line, since regular tape can lift acrylic when removed.
- Pick two colors with real contrast, like cream and espresso, rather than two similar neutrals, or the split won’t read clearly from a distance.
Nail Shape Match
This color-block split suits medium square or coffin nails best, since the wider free edge gives the two-tone division enough room to stay legible.
13. Glazed Donut Chrome Acrylic Nails
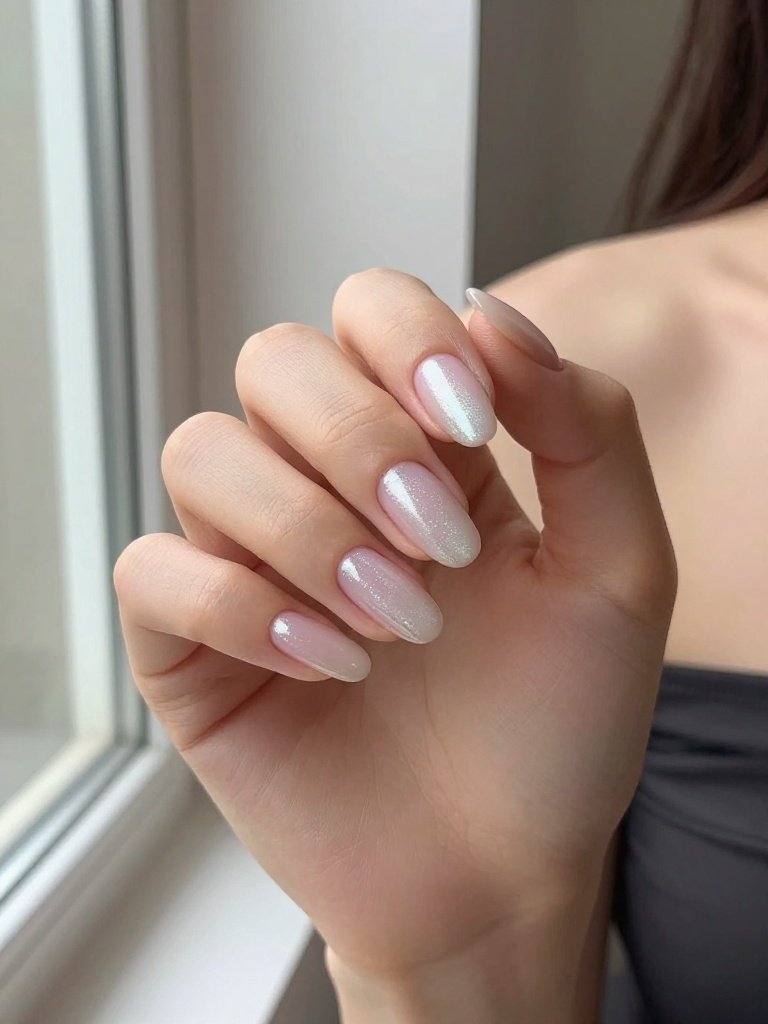
A sheer, milky white-pink base gets dusted with a fine pearlescent chrome powder buffed on top, producing a soft, hazy glaze rather than a hard mirror shine, closer to the inside of a seashell than a reflective chrome finish. The powder is applied with a small sponge in light, circular motions directly over tacky gel, and a quick pass with a soft buffing block beforehand helps the powder grip evenly, since less product actually produces the better result here and a heavy hand turns the glaze opaque and metallic instead of soft.
Tip
- Ask for “pearl chrome,” not “mirror chrome,” when booking, since mirror powder produces a much harder, more reflective finish than this soft glaze.
- Request the powder applied in thin layers you can build up gradually, since it’s much easier to add more than to remove excess.
- One honest limitation: this glaze finish shows fingerprints and light scratching more easily than a standard glossy topcoat, so it needs a fresh seal sooner.
- Choose a soft pink-white or champagne base underneath rather than stark white, since it lets the pearl powder catch a warmer glow.
Nail Shape Match
The soft glaze reads best on medium almond or oval nails, where the curve helps the pearlescent finish catch light evenly across the whole nail.
14. Hand-Painted Snakeskin Acrylic Nails
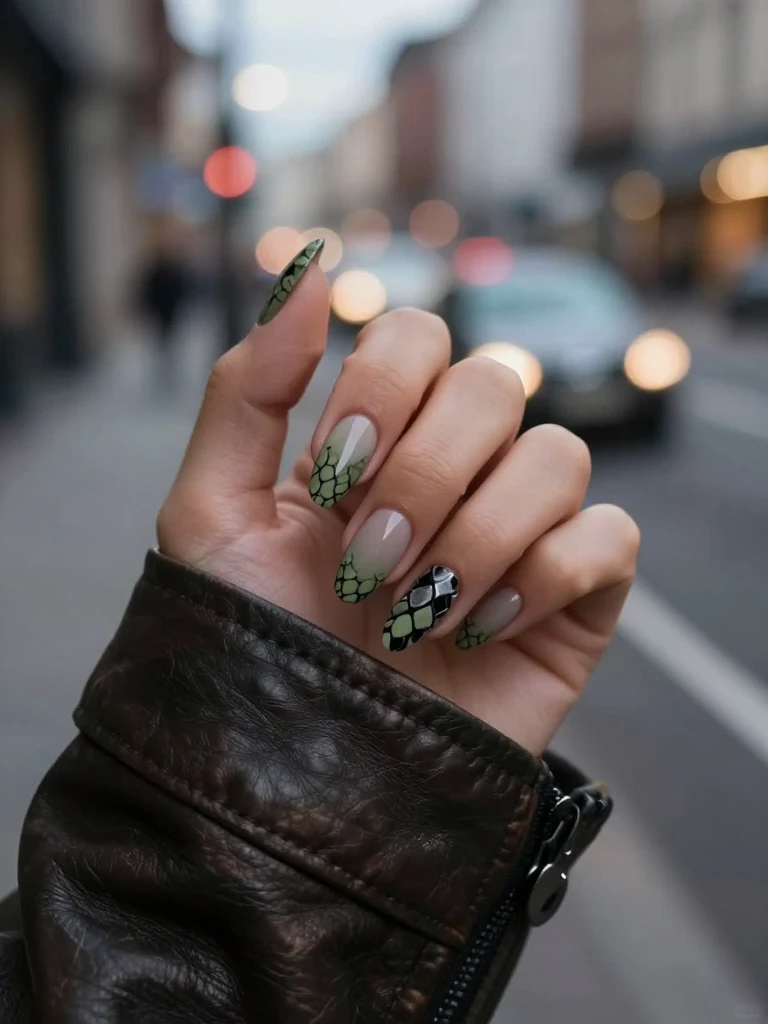
Interlocking scale-shaped outlines are hand-painted in a muted olive, taupe, or black palette across one or two accent nails, each scale individually shaded to give the print real dimension rather than a flat repeating pattern, the kind of detail that separates a salon-quality manicure from a stamped design. The scales are built up in layers, a base shade first, then a slightly darker tone painted into the center of each scale shape, which is what creates the subtle 3D look real snakeskin has.
Tip
- Ask specifically for “hand-painted scale shading,” since a stamped or decal snakeskin print looks noticeably flatter than one built in layered shades.
- Request this print on just one or two accent nails paired with a solid neutral on the rest, since a full set can read busy fast.
- Choose a muted, earthy color palette over anything bright. True snakeskin print relies on tonal shading, not high contrast, to look realistic.
- Request the scale outlines slightly irregular in size rather than perfectly uniform, since real snakeskin scales vary naturally rather than repeating identically.
- Pair this print with a matte topcoat instead of glossy if you want the pattern to look closer to genuine leather texture.
Nail Shape Match
This print works particularly well on medium coffin or stiletto shapes, where the elongated surface gives each scale room to taper naturally.
15. Matte 3D Sugar-Textured Acrylic Nails
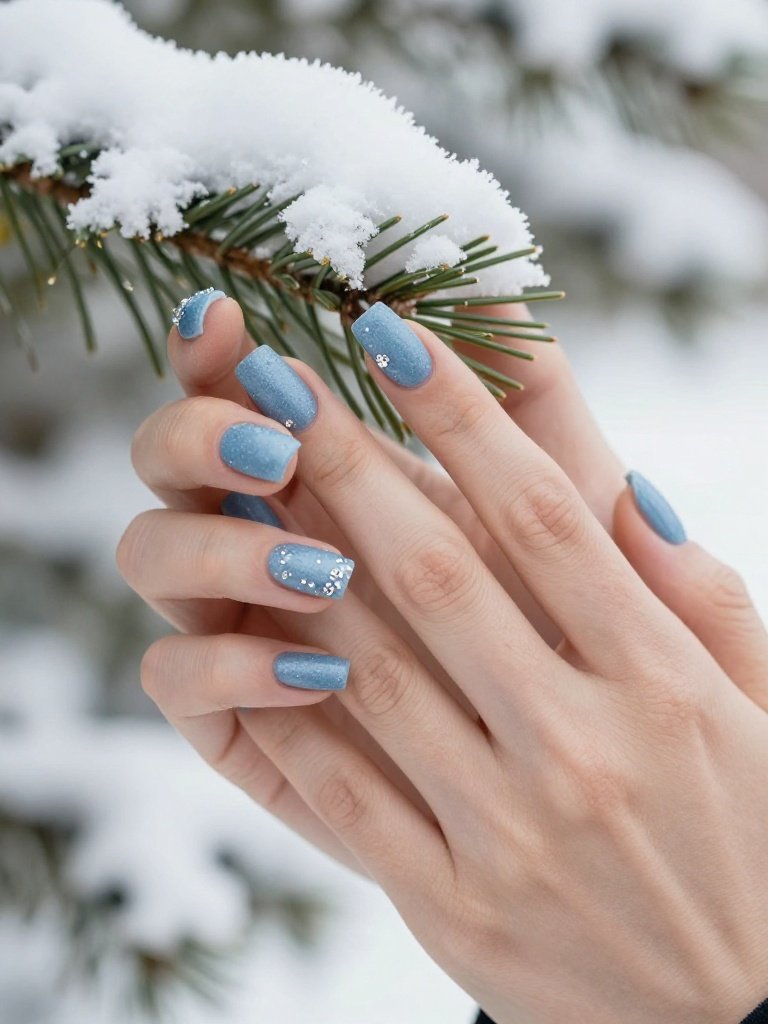
Fine, textured acrylic powder gets pressed onto a matte white or icy blue base while it’s still tacky, creating a genuinely gritty, snow-like surface texture you can feel, not just see, finished with tiny embedded rhinestone “snowflakes” scattered across a few nails. If you’ve been hunting for a short acrylic nail idea that still photographs well, this one delivers plenty of texture even at a shorter length, and the finish tends to hold up as a long-lasting manicure since the granular surface hides everyday scuffing better than a smooth gloss. The textured powder is applied with a dry brush in a light patting motion rather than smoothed flat, which is what keeps the granular texture from compressing back down.
Tip
- Ask for “sugar acrylic texture,” specifically, since regular acrylic powder applied over a set nail won’t produce the same rough, granular surface.
- Request a matte, not glossy, topcoat sealed only around the rhinestone placements, or the texture underneath gets flattened and loses its snow-like effect.
- This texture catches on fabric more than a smooth set, so skip it if you’re heading into a season of heavy sweaters and gloves.
Nail Shape Match
Best on short or medium square nails, since the textured surface reads more clearly on a flatter shape than it would on a curved almond tip.
16. Pop Art Color Swirl Acrylic Nails
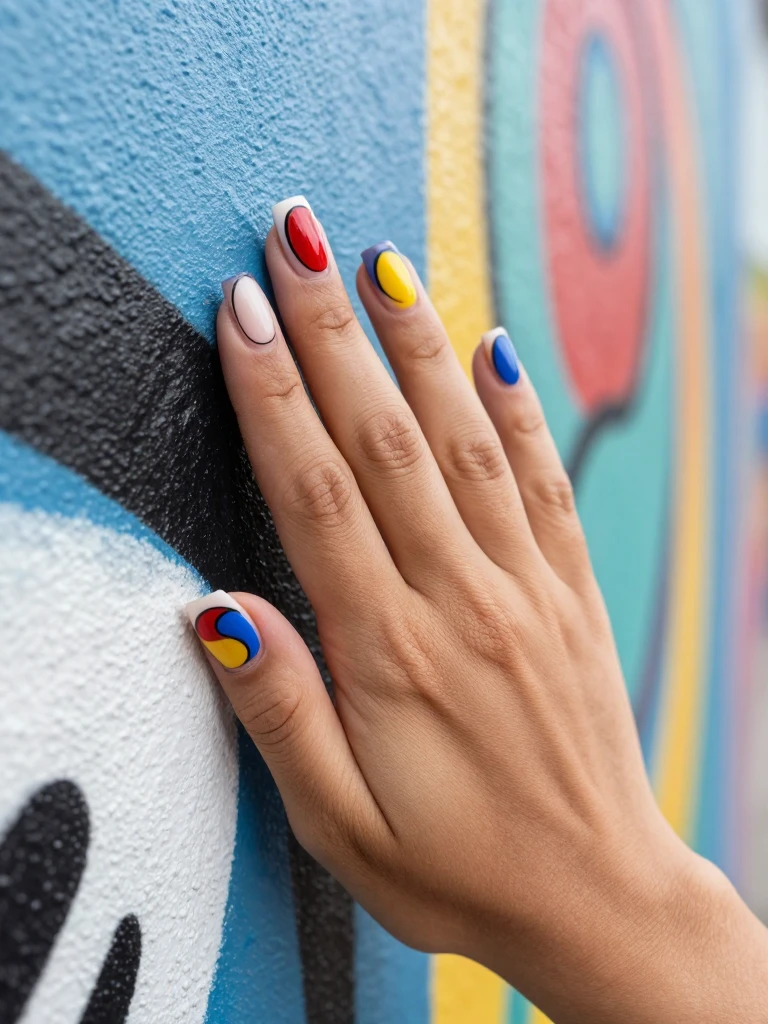
Thick, glossy swirls in primary colors, cherry red, cobalt blue, sunshine yellow, are piped across a white base using a fine detail brush in loose, continuous curves, closer to abstract painting than a symmetrical pattern, with each swirl outlined in a thin black line for definition. The swirls are painted freehand in one continuous stroke per color rather than built from separate dots or shapes, starting just above the cuticle area and sweeping outward, which gives the design its loose, painterly energy.
Tip
- Ask for the black outline added last, after each colored swirl has fully cured, so the line stays crisp instead of bleeding into the wet color underneath.
- Request a high-gloss topcoat specifically, since this design depends on shine to read as playful rather than muddy under matte finish.
- If you want a subtler version, ask for the swirls on just two accent nails with the rest kept a plain white base.
- Ask your tech to leave small gaps of visible white base between swirls rather than covering the whole nail in color, which keeps the design feeling airy.
Nail Shape Match
Works well on medium square or coffin nails, giving the freehand swirls a wide, flat canvas that keeps the pattern from looking cramped.
17. Jelly Glass Acrylic Nails With Embedded Gems
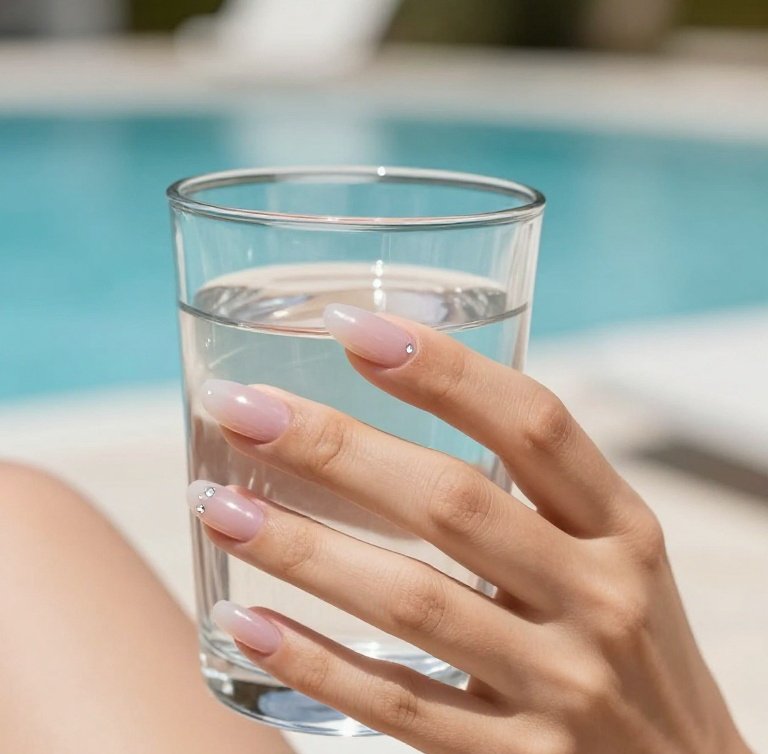
Blush pink or clear jelly-toned acrylic lets the natural nail show through with a glassy, almost underwater quality here, finished with a scattering of small, flatback gems pressed into the tip section while the acrylic is still curing. The jelly effect comes from a specific sheer, gel-like acrylic powder rather than a standard opaque one, applied thinly enough near the apex that it never turns cloudy, and the gems are set into the acrylic itself during application, not glued on afterward, so they sit flush instead of raised.
Tip
- Ask for “jelly acrylic powder” by name, since a sheer polish over a solid acrylic won’t create the same glassy depth.
- Request the gems embedded during the acrylic application rather than glued on top afterward, which keeps them from catching or lifting later.
- Keep the gem placement scattered near the tip only. Covering the whole nail in gems defeats the point of the sheer, glass-like base underneath.
Nail Shape Match
This glassy finish suits oval or almond nails particularly well, since the curved shape lets light travel through the translucent base more evenly.
18. Extreme Stiletto Acrylic Nails With Airbrushed Florals
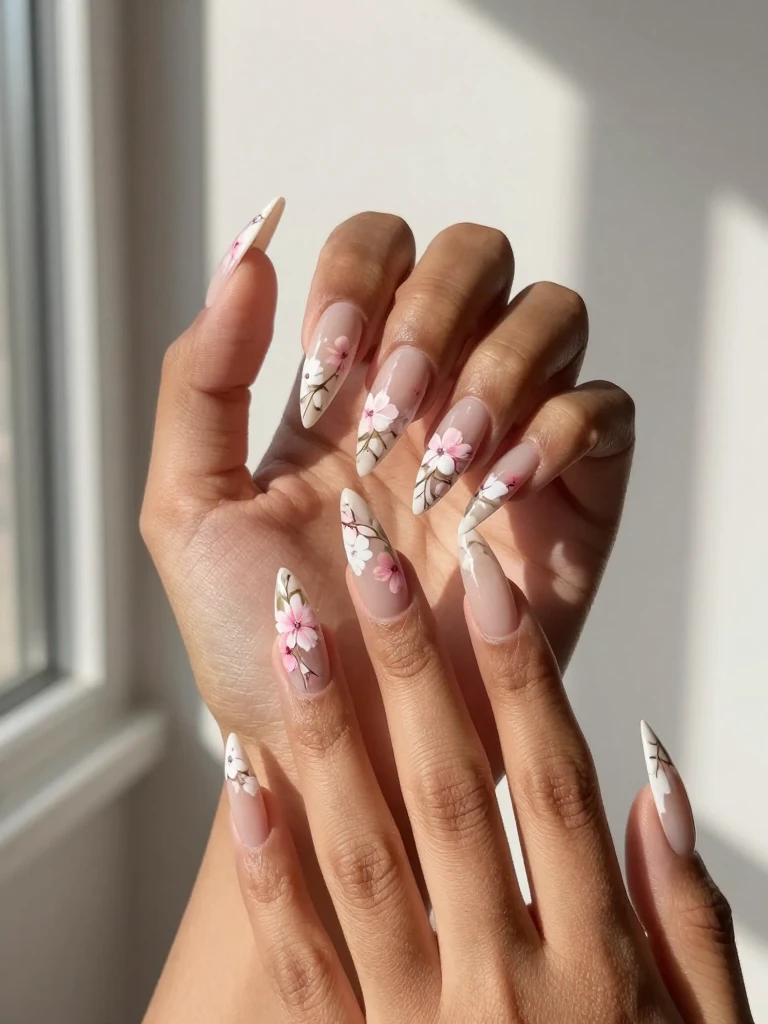
Dramatically long, sharply tapered stiletto tips get an airbrushed floral design, soft pink and white blossoms with fine green stem detail, painted along one side of each nail in an asymmetrical, trailing pattern rather than centered blooms. The stiletto shape itself is built with significant added length using sculpted tips and structural acrylic, since this point can’t be achieved with natural nail length alone.
Tip
- Confirm your tech is comfortable filing a true stiletto point, since an uneven taper is one of the most common issues with this shape specifically.
- Ask for the floral detail placed asymmetrically along one side rather than centered, which reads as more intentional and less cluttered at this length.
- This is genuinely one of the higher-maintenance picks on this list. The extreme length limits everyday tasks like typing or opening cans more than any other design here.
- Ask for a slightly shorter stiletto length if this is your first time wearing the shape, since starting shorter helps you gauge how manageable the point feels day to day.
Nail Shape Match
Exclusively for long or extra-long stiletto nails, since the sharp taper and dramatic length are the entire point of this shape.
Quick Comparison
| Design Name | Best Nail Shape | Longevity | Difficulty |
|---|---|---|---|
| Checkerboard French With Bows | Long coffin | 3-4 weeks | Advanced |
| Diagonal Glitter French | Medium coffin/square | 3-4 weeks | Moderate |
| Milky Lilac Pressed Florals | Medium square | 3 weeks | Moderate |
| Chrome Mirror Aura | Medium almond/oval | 3-4 weeks | Moderate |
| Sculpted 3D Floral | Short/medium coffin | 2-3 weeks | Advanced |
| Marbled French, Gold Veining | Medium square/coffin | 3-4 weeks | Advanced |
| Cat-Eye Magnetic Ombre | Almond/medium coffin | 3-4 weeks | Moderate |
| Airbrushed Sunset Line Art | Medium square | 3 weeks | Advanced |
| Full Encapsulated Botanicals | Squoval/medium square | 3 weeks | Advanced |
| Rhinestone Statement Accent | Almond/coffin | 2-3 weeks | Moderate |
| Negative Space Geometric | Squoval/short square | 3 weeks | Advanced |
| Two-Tone Split French | Medium square/coffin | 3-4 weeks | Moderate |
| Glazed Donut Chrome | Medium almond/oval | 2-3 weeks | Easy |
| Hand-Painted Snakeskin | Medium coffin/stiletto | 3 weeks | Advanced |
| Matte 3D Sugar Snow | Short/medium square | 2-3 weeks | Moderate |
| Pop Art Color Swirl | Medium square/coffin | 3 weeks | Moderate |
| Jelly Glass With Gems | Oval/almond | 3 weeks | Moderate |
| Extreme Stiletto Florals | Long/extra-long stiletto | 3-4 weeks | Advanced |
Frequently Asked Questions
How long do acrylic nails usually last before a fill is needed?
Most acrylic nails need a fill every two to three weeks as the natural nail grows out and creates a visible gap at the cuticle. Designs with dense detail, like rhinestones or 3D sculpting, tend to hold up closer to the shorter end of that window.
What’s the best acrylic nail shape for someone who works with their hands a lot?
Short or medium square and squoval shapes hold up best for hands-on work, since they don’t have a sharp point to catch or chip, and a quick pass with a nail file at the first sign of a rough edge keeps them from snagging. Long coffin and stiletto shapes look striking but require more day-to-day care around typing, opening cans, or physical tasks.
Can you get acrylic nails with 3D or textured designs done at any nail salon?
Not every salon offers advanced techniques like 3D sculpting, encapsulated florals, or sugar texture, since these require extra training and tools beyond a standard acrylic set. It’s worth asking directly whether a tech specializes in 3D or textured acrylic work before booking.
Are chrome or aura acrylic nails hard to maintain?
Chrome and aura finishes hold up about as long as a standard glossy set, generally three to four weeks, but they show fingerprints and light surface scratching more visibly than a regular topcoat. A fresh glossy seal every couple of weeks keeps the finish looking crisp.
What acrylic nail design works best for a first-time acrylic wearer?
A milky base with a single accent nail, such as a pressed floral design or a glazed donut chrome finish, is a gentler starting point than a full detailed set. It gives a taste of dimension and finish without committing to the upkeep of dense stone work or extreme length.
Final Thoughts
The through-line across every idea here is technique. Checkerboard grids, encapsulated florals, and chrome aura blends all read as considered rather than default, which is exactly what makes a set worth the extra chair time. Treat this as an acrylic nail designs gallery you can bring straight to your appointment, along with the specific technique name from whichever idea you land on, since that vocabulary alone will get you a far more accurate result than a vague description. Start with whichever shape and finish actually fits your daily routine, not just the one that photographs best.


Pingback: Which Classy Nails Actually Suit You? 19 Practical Picks - Glow Vibes Spot