A snug piercing is a horizontal cartilage piercing placed through the inner ridge of the ear, between the helix and anti-helix. Unlike larger ear placements, it creates a compact line across the middle of the ear, making even simple jewelry look intentional and refined.
From minimalist titanium bars to gemstone ends, gold details, and complete ear stacks, snug piercing styles can fit different aesthetics. This guide covers 16 jewelry ideas with styling inspiration, placement notes, and practical tips to help you choose a look that matches your ear anatomy and personal style.
What Makes a Snug Piercing Different From Other Ear Piercings?
A snug piercing stands out because of its unique position inside the ear. While a helix piercing follows the outer rim and a conch piercing sits in the flat center cartilage, a snug crosses the inner cartilage ridge horizontally. This placement creates a small but noticeable detail that works especially well in curated ear designs.
The snug is also different from a rook piercing, which sits higher in the upper cartilage fold. Both placements add depth to an ear stack, but a snug creates a horizontal visual line, while a rook creates a more vertical accent.
Because the snug passes through a thicker cartilage fold, jewelry selection and placement accuracy matter more than many other ear piercings. A professional piercer will check your ear anatomy first to confirm whether the ridge has enough space for a comfortable and stable placement.
How to Choose Jewelry for a Snug Piercing
Choosing the right jewelry is one of the most important parts of getting a snug piercing that looks good and heals properly. Unlike simple lobe piercings, snug jewelry needs to follow the natural curve of the cartilage.
Curved Barbells Are the Standard Choice
Most snug piercings start with curved barbells because they sit naturally against the ear’s shape. The curved design reduces unnecessary pressure on the cartilage and creates the classic snug appearance.
Titanium Is the Best Starting Material
Implant-grade titanium is one of the most popular choices for fresh cartilage piercings because it is lightweight, durable, and suitable for sensitive skin. Gold can also work well, especially for healed piercings, when it is high quality and properly made.
Keep Decorative Jewelry for Later
Gemstones, charms, and detailed ends can completely change the appearance of a snug piercing, but they are usually better saved until the piercing has healed. Starting with simple jewelry makes cleaning easier and reduces irritation during recovery.
Consider Your Ear Anatomy First
Not every ear has the same cartilage structure. A jewelry style that looks perfect in photos may not sit correctly on every ear. Your piercer should check the ridge depth, angle, and available space before choosing the final placement.
1. Single Ball Snug Piercing for a Clean First Look
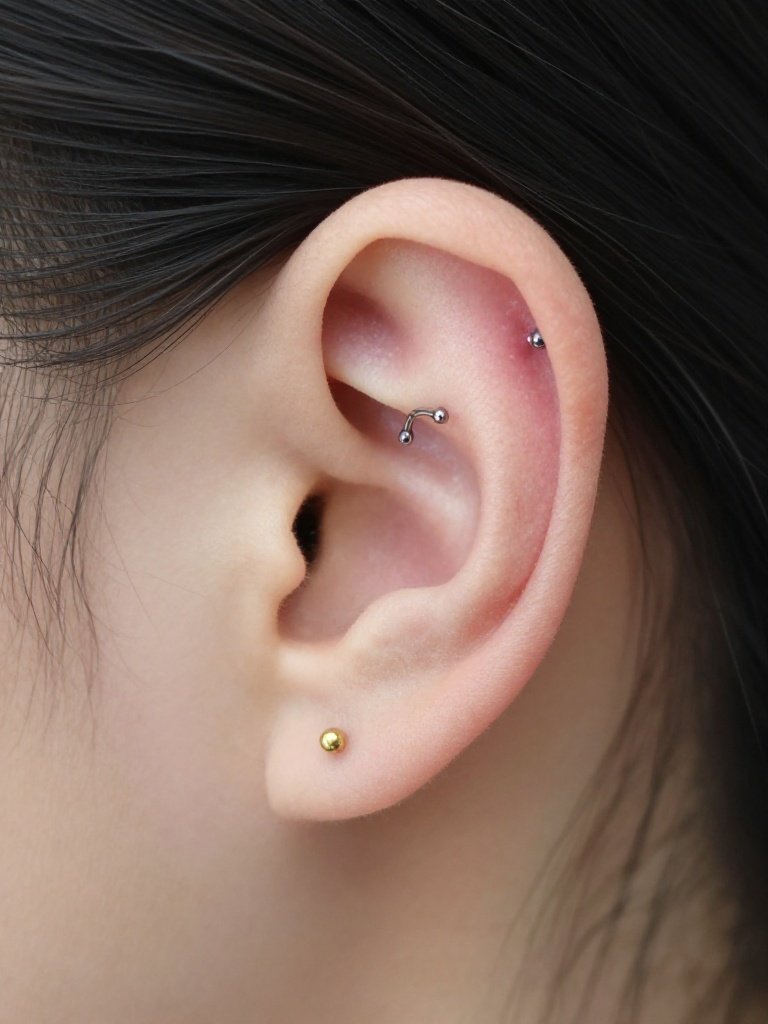
A plain curved barbell with one small ball end, usually 3mm and a standard 16 gauge, is the version most piercers recommend for a first attempt at this placement. It sits flush against the ridge of cartilage with no charm or gem competing for attention, so the shape of the piercing itself is the whole look. This placement tends to be more uncomfortable during the actual piercing than a lobe or helix since the needle passes through a thicker fold of cartilage, and most people are looking at a healing window of six months to a year before it feels fully settled.
Tip
- Ask specifically for a curved barbell in implant-grade titanium rather than surgical steel for the initial piece, since that grade carries a lower reaction risk in cartilage.
- Have the piercer size the bar to your ear’s curve in person rather than picking a length off a chart, since a bar that’s even slightly too long raises the risk of migration.
- Skip anything with a flat back or a large ball for the first several months. A bulkier end puts pressure on healing tissue and slows things down.
Styling Note
This one sits low-profile enough to wear to work or school without drawing much attention, and it pairs cleanly with a single lobe stud if that’s all you’re starting with.
2. Snug Piercing Paired With a Rook for a Vertical Ear Stack
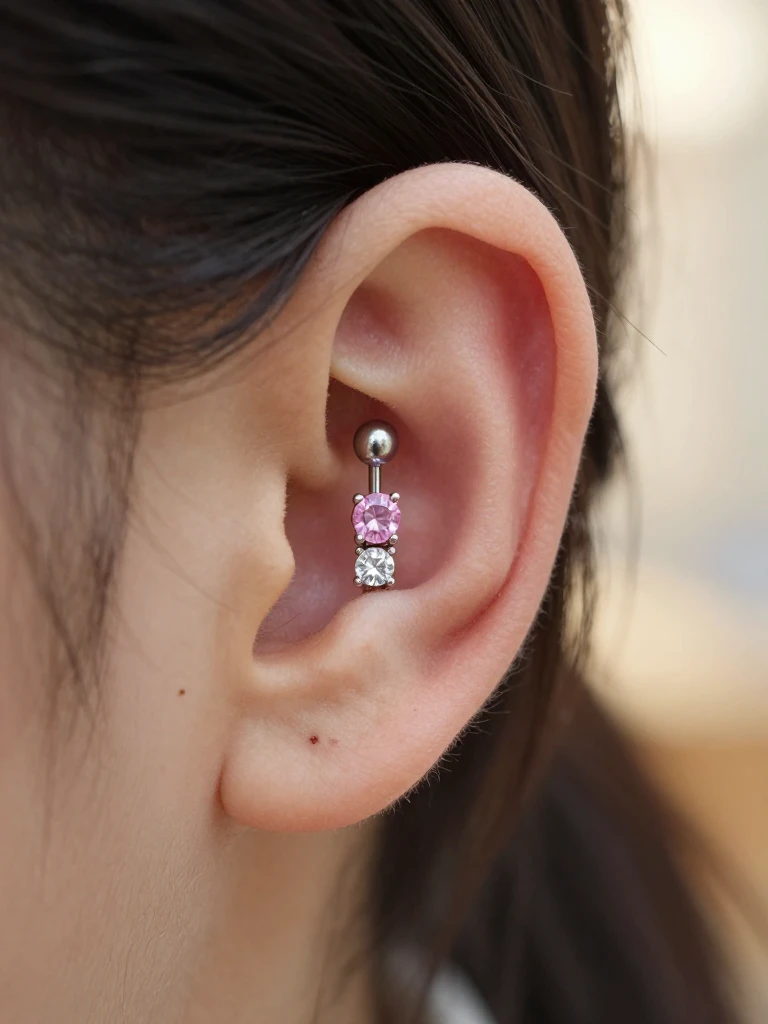
Stacking a snug directly above a rook piercing creates a vertical line running through the middle of the ear, especially when the two pieces use different finishes, like a soft pink gem curved barbell on top and a plain silver ball on the rook underneath. Two princess-cut lobe studs stacked below tie the whole line together without adding another cartilage piece. If you’re only adding one new piercing this year, this pairing is what most piercers point people toward first.
Both placements sit in comparably thick cartilage, so expect a similar pinch during the actual piercing and a healing arc of roughly six to nine months, with the rook and the anti-helix ridge close enough together that healing one doesn’t put pressure on the other.
Tip
- Bring a reference photo showing the exact vertical spacing you want, since even a few millimeters of misalignment throws off the line.
- Ask your piercer whether your anatomy has enough of a defined ridge for both points, since a shallow anti-helix can make this placement sit at an awkward angle.
- Get the rook done first and let it settle for a few weeks before adding the snug, so swelling from one doesn’t distort where the other needs to sit.
- Choose jewelry finishes that intentionally differ, like a colored gem on top and a plain silver ball below, rather than matching metals throughout.
Styling Note
The vertical stack is visible from a front-facing angle even when your hair is down, which makes it a strong option if you want the detail to actually register in photos.
3. Snug Piercing Layered Into a Gold Hoop Constellation
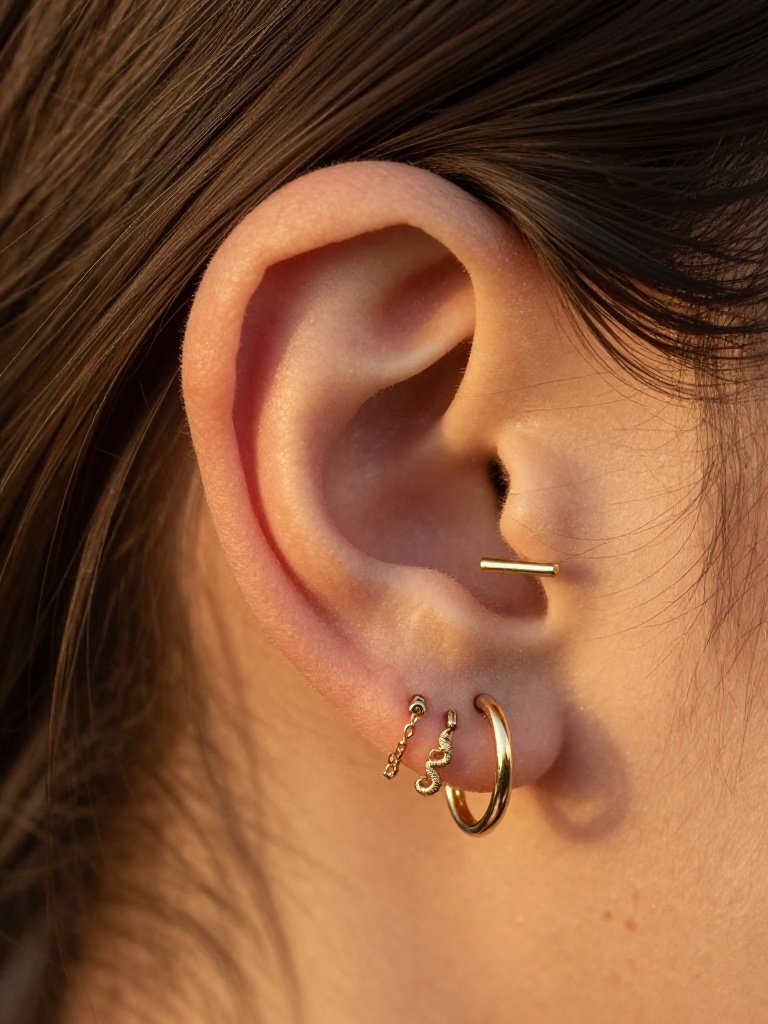
Thin gold hoops climb the helix and forward helix in this stack, anchored by a horizontal snug bar that sits underneath them like a base line, with a tiny coiled snake charm set on a small clicker hoop near the front of the ear and a delicate chain looping from one hoop down to a lobe stud. It’s a maximalist take that works best on an ear that already has three or more piercings to build around. Cartilage piercings like these tend to sit in the middle of the pain scale, more noticeable than a lobe but shorter to heal than a daith, usually landing somewhere around four to eight months.
Tip
- Have hoops added in ascending order of size, starting with an outer helix piercing, moving down toward a forward helix piercing, and finishing at the snug, so the eye reads it as one intentional line.
- Ask specifically for 14k gold or gold-filled hoops rather than gold-plated, since plating wears off with the repeated contact hoops get from hair and pillows.
- A chain connecting two piercings needs both anchor points fully healed first. Adding it too early puts constant tension on tissue that’s still repairing.
- Save the chain detail for last, after every hoop involved has fully healed, since tension on fresh cartilage during the early months will slow things down.
- Match the wire gauge across all the hoops even if their sizes vary, so the stack reads as one cohesive set rather than mismatched pieces.
Styling Note
This is one of the more visible options on the list day to day, since the hoop cluster catches light even under hair, and it’s typically paired with a full helix or forward helix row rather than worn alone.
4. Snug Piercing Finished With a Silver Hoop Cascade
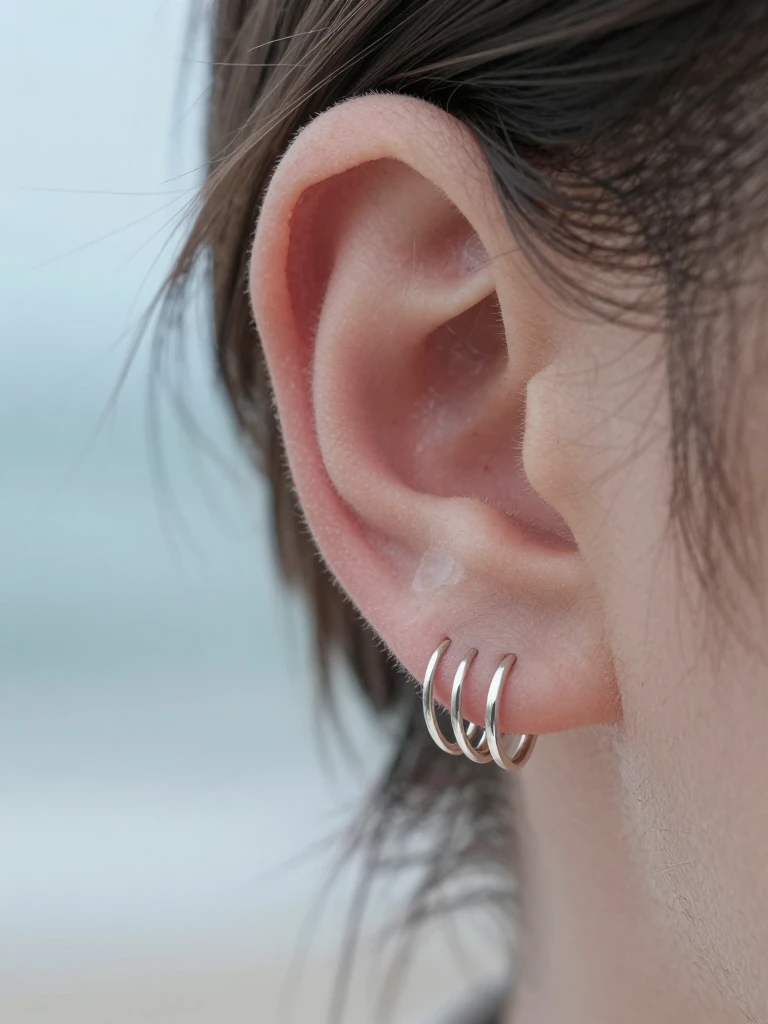
Instead of a single hoop, this version runs three or four thin silver hoops in slightly graduated sizes from the lower helix down toward the lobe, with the snug bar sitting as the one flat, non-hoop piece in the mix for contrast. Swapping one ring for a small huggie hoop adds subtle shape variation without breaking the overall cascade. Silver tarnishes faster than gold with regular contact, so this one reads a little more high-maintenance than the gold version above. Each hoop heals on its own timeline depending on where it sits, but expect roughly six to eight months, similar to any helix piercing in that area, before the whole look feels settled.
Tip
- Use sterling silver or rhodium-plated hoops, or swap one for a small captive bead ring, rather than plain silver-tone alloy, which will discolor against skin within weeks.
- Space the hoops so no two sit closer than a few millimeters apart. Crowding them makes the ear look cluttered rather than curated.
- Clean hoops separately from any piercing you’re still healing, since shared contact between fresh cartilage and jewelry that’s been handled can slow things down.
Styling Note
The cascade effect is most visible from the side, so it photographs better in profile shots than head-on ones, and it pairs naturally with simple stud lobes rather than another hoop below it.
5. Snug Piercing Hoop Instead of a Curved Barbell
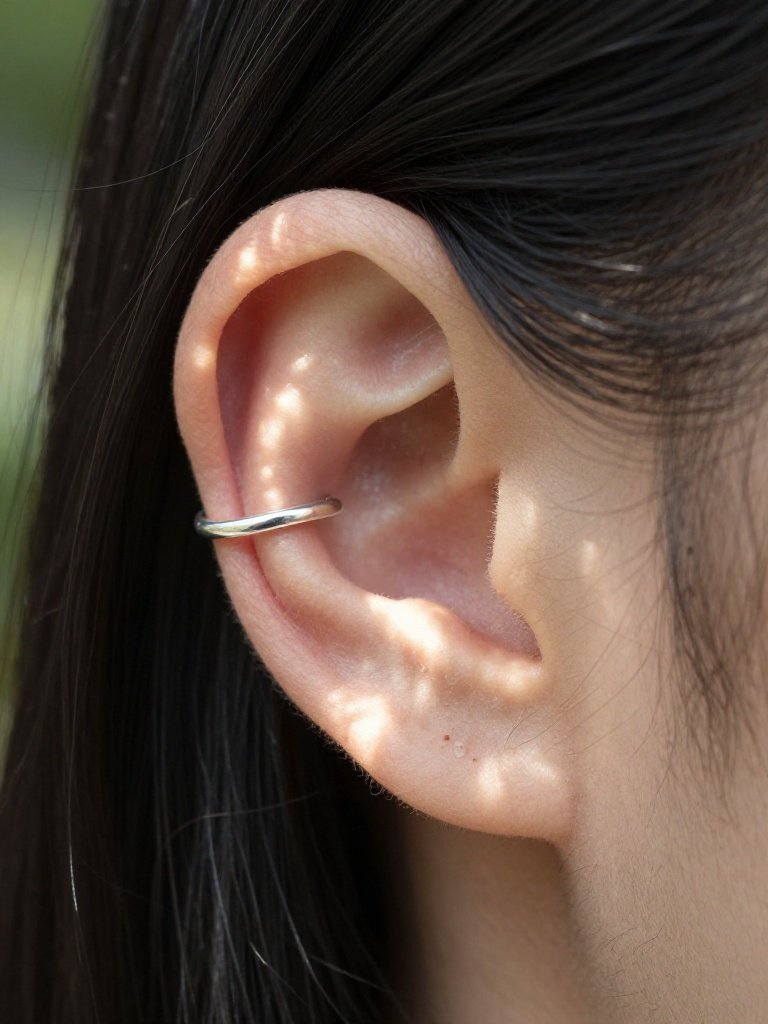
Most piercings in this spot are done with a curved barbell because the shape sits flatter against the ear, but a small seam ring bent to fit the anti-helix ridge is possible on the right anatomy and gives the placement a rounder, softer look than the usual straight bar. It’s not an option every piercer will offer for a first attempt, since the ridge needs enough of a defined curve to hold a ring without it sliding.
That’s the honest trade-off here: it looks great on the ears built for it, but forcing a ring where the ridge is too shallow raises the odds of rejection over time. Healing wise it sits in the same six-month-to-a-year range as the standard version, though a ring can feel a touch more noticeable day to day while things settle.
Tip
- Ask your piercer directly whether your anti-helix ridge has enough definition to hold a hoop instead of a bar, since this is the deciding factor, not personal preference.
- Expect a longer initial settling period with a ring than a barbell, since the curved shape shifts more with everyday movement while tissue is still closing.
- If a hoop isn’t right for your ear shape, a curved barbell with a small captive-style bead front can approximate the same rounder look.
- If a ring turns out to be uncomfortable partway through healing, ask about switching to a curved barbell rather than pushing through. The anatomy issue won’t resolve on its own.
Styling Note
When it works, this reads as noticeably softer and more organic than the standard bar, and it’s usually worn with minimal jewelry elsewhere so the ring itself stays the focal point.
See Also: 17 Stunning Ashley Piercing Ideas With Expert Styling Tips
6. Faux Snug Piercing With a Clip-On Cuff
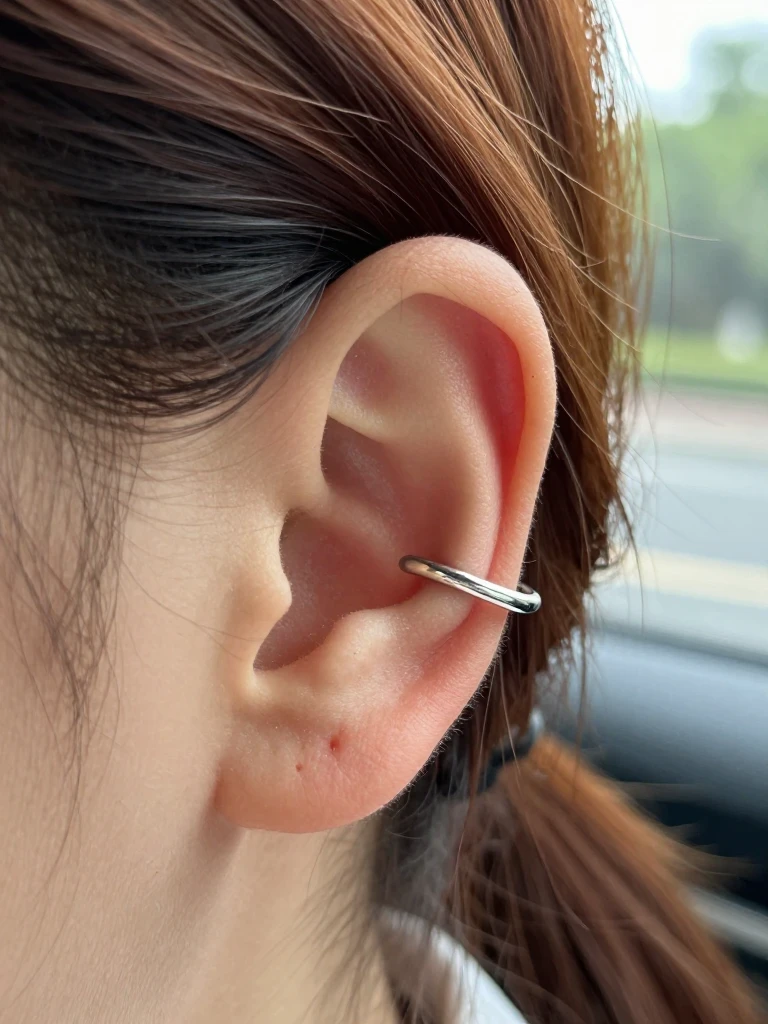
A faux snug uses a spring-hinge ear cuff shaped to sit across the same ridge a real snug occupies, with no needle involved at all. It’s the option worth knowing about if you like the visual line this placement creates but aren’t ready to commit to cartilage healing, or if you want to test how it looks on your specific ear before booking an appointment.
The cuff clips onto the fold of the anti-helix and stays in place through friction rather than a post, so it can be removed and repositioned as often as you like. Unlike an actual piercing, there’s no wound to heal and no discomfort involved at all, which makes it a genuinely low-commitment way to preview the look.
Tip
- Try the cuff on for a few days before getting the real piercing done. It’s the easiest way to confirm the placement actually suits your ear shape.
- Look for a cuff with a soft, adjustable hinge rather than a rigid one, since a stiff cuff pinches the same fold of cartilage a real piercing would sit in.
- Don’t wear a cuff directly over a piercing that’s still healing anywhere nearby. The pressure point can irritate tissue that isn’t fully closed.
Styling Note
This one is entirely temporary and repositionable, which makes it the most flexible option on the list for anyone still deciding how many cartilage pieces they actually want.
7. Snug Piercing With an Opal End
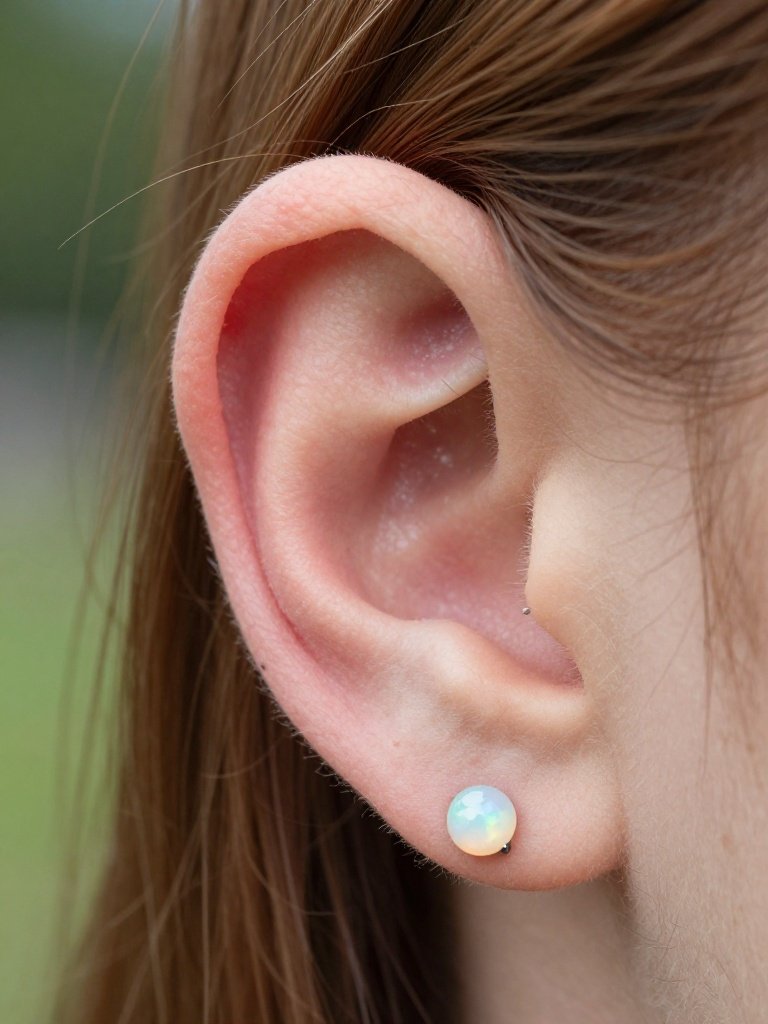
The standard plain ball end swaps out here for a small opal cabochon, giving the placement a soft, milky color shift depending on the light, without adding the extra shine a clear gem would. It reads as a quieter upgrade from the single ball look, since the color is the only change and the shape of the piece stays minimal. Opal ends run slightly thicker than a plain ball, so it’s worth waiting until healing is at least a few months along before switching to one. Since this sits in the exact same spot as a standard version, expect the same moderate pinch during piercing and a six-to-twelve-month healing window.
Tip
- Ask for a genuine opal or a lab-created opal rather than an opalite imitation, which tends to look flat and plastic-like under indoor lighting.
- Have the end threaded onto titanium or niobium, not the opal itself, since the gem is set into a metal base that needs to be reaction-safe.
- Avoid pressing on the piece to check it’s secure. Opal settings are more delicate than a plain ball and can loosen with repeated handling.
- Check that the opal is set with enough metal surrounding it to keep the stone secure long-term, since a shallow setting is more likely to chip.
- If you’re not sure about committing to opal, ask your piercer about a clear cubic zirconia version first to test the shape before choosing a pricier stone.
Styling Note
The pastel shift in the stone makes this a good match for an otherwise simple ear, where you want one point of visual interest without a full stack around it.
8. Snug Piercing and Daith Diamond Duo
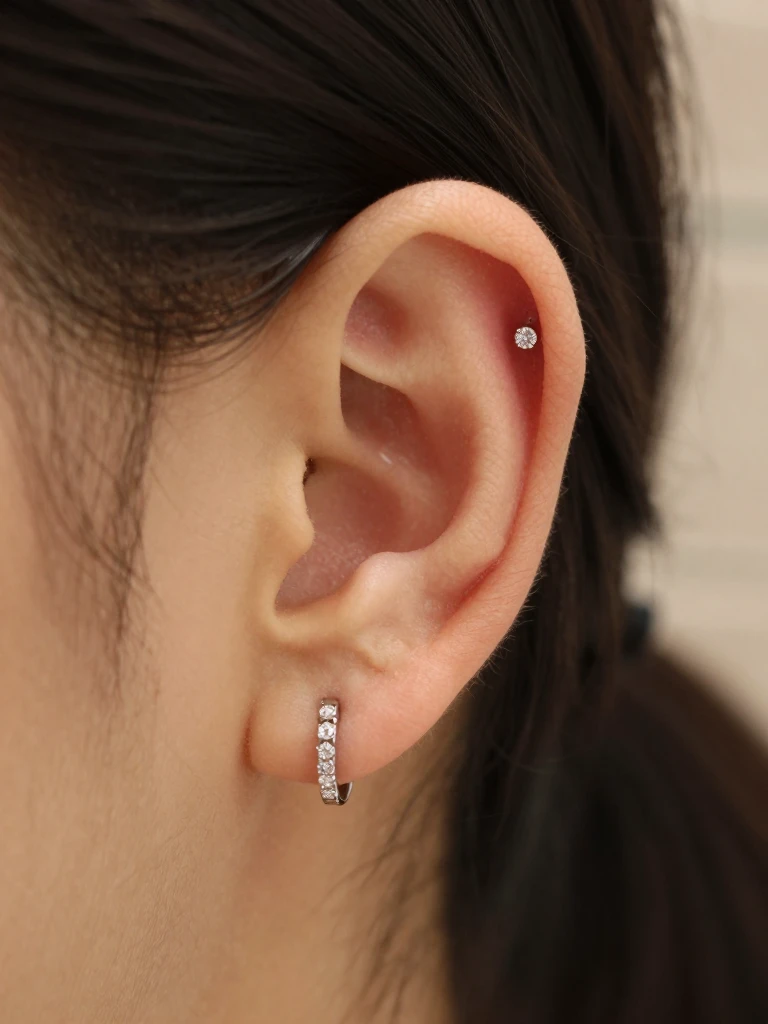
A small diamond-set curved barbell in the snug, paired with a matching diamond hoop or barbell in the daith, creates two points of sparkle sitting close together in the inner ear, both catching light from a similar angle. The daith piercing sits in a deeper fold than the snug, so this combination usually means two genuinely different healing experiences happening at once. Piercers generally rank the daith as one of the more intense cartilage placements to sit through, noticeably more than the snug, with healing on the daith often stretching close to a year.
Tip
- Get these done as two separate appointments spaced several weeks apart rather than together, since swelling in one fold can distort placement in the other.
- Ask your piercer to match the diamond size across both pieces, and confirm whether the ends are internally or externally threaded, since externally threaded pieces leave exposed threading that can irritate fresh cartilage more than internally threaded ones.
- A cluster this close together needs jewelry with a low, flush profile. Anything with a raised setting will catch on hair constantly.
- If budget matters, put the larger diamond on the daith and a smaller matching stone on the other piece, since the daith sits deeper and reads as the focal point anyway.
Styling Note
This pairing sits fairly deep in the ear and isn’t especially visible from a distance, so it tends to be worn by people who want the detail for themselves more than for how it photographs.
9. Snug Piercing Paired With a Tragus Double Stack
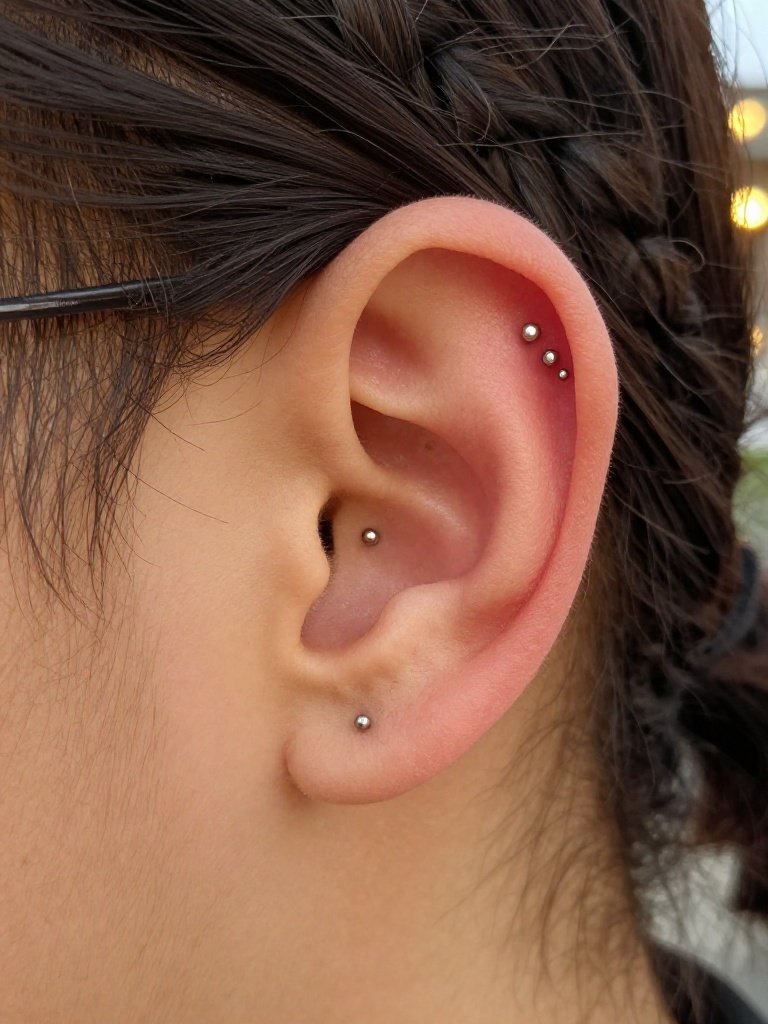
A pair of tragus piercing studs, stacked alongside the snug bar, build a tight cluster in the front-center of the ear, an area that reads as busy and deliberate rather than sparse. This is a heavier concentration of piercings in one small zone, so the actual sitting can feel more intense simply because there’s more tissue being worked on in a single visit, even though none of the individual placements is more painful than usual on its own. Healing timelines for the tragus studs typically run shorter than the snug, often closing up within three to four months.
Tip
- Get the snug done first and let it heal before adding the tragus studs, since crowding fresh piercings into the same small area at once raises the risk of irritation.
- Choose flat-back studs for the tragus specifically, since the space is tight and a standard post end will press against the opposite side of the ear.
- Ask your piercer to mark exact dot placement for both tragus studs before piercing either one, so the pair ends up symmetrical rather than eyeballed.
Styling Note
This cluster sits front and center on the ear, making it one of the more noticeable combinations here, and it’s typically worn without much else competing for attention nearby.
10. Snug Piercing With a Chain Drape to the Conch
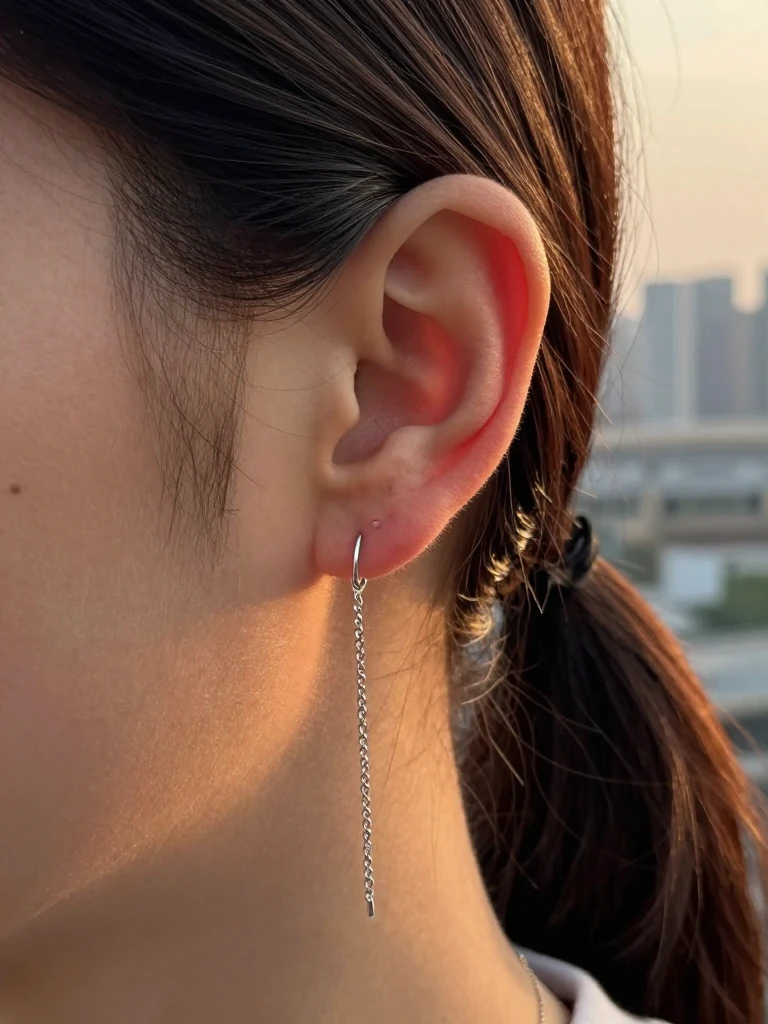
A fine chain connecting the snug bar to a stud in the conch below adds movement to an otherwise static placement, swinging slightly with head movement in a way solid jewelry can’t. The chain has to be short enough that it doesn’t catch on hair but long enough to actually drape rather than pull taut, which is a balance most people need a piercer’s help getting right rather than eyeballing it. Both anchor points need to be fully healed, typically six months to a year for cartilage like this, before the chain goes on, since any tension on fresh tissue slows things down, and neither spot involves more discomfort during piercing than a standard cartilage placement.
Tip
- Wait until both pieces are at least six months healed before adding a connecting chain, not just scabbed over.
- Ask for a chain with a spring clasp on at least one end so it can be removed for sleeping, since constant tension overnight can stretch the piercing over time.
- Choose a chain length that leaves visible slack. A taut chain between two piercings will pull on both with every head turn.
- Ask your piercer to demonstrate how the chain sits with your head tilted forward, not just upright, since that’s when a too-short chain will pull.
Styling Note
The draped chain adds a bit of motion that’s most noticeable when your hair is pulled back, and it’s usually paired with simple, unadorned jewelry elsewhere so the chain itself reads as the statement piece.
11. Anti Snug Piercing as the Snug’s Mirror Placement
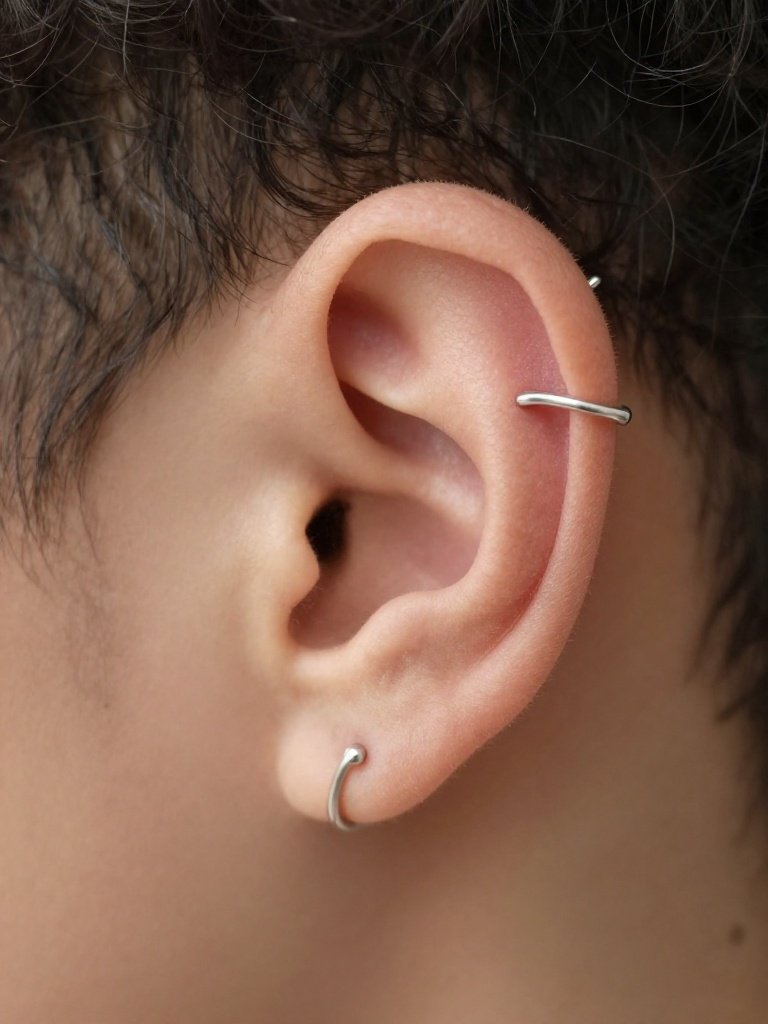
The anti snug sits on the outer rim of the ear roughly opposite where a standard snug sits on the inner ridge, and pairing the two creates a wraparound effect where a piece of jewelry seems to circle partway around the ear from two different points. It’s a less common ask than the standard version, so it’s worth confirming your piercer has done this placement before rather than assuming every studio offers it. Because it sits on thinner cartilage near the outer rim, most people find it slightly more tolerable than the inner ridge, with healing running in a similar six-month to one-year range.
Tip
- Say exactly this to your piercer: “I want an anti-helix piercing on the outer rim, sometimes called an anti snug, not the standard inner snug.” The naming gets confused often enough that clarity matters.
- Confirm the piercer has photos of anti snug placements they’ve done previously, since it’s a less requested spot and technique varies.
- Keep the jewelry on both placements matching in metal and finish if you want the wraparound effect to read as one continuous idea.
- If your piercer hasn’t done this pairing before, ask to see healed photos from their own portfolio rather than stock reference images.
- Consider getting the second piece several months after the first rather than at the same time, so swelling from one doesn’t distort the other.
Styling Note
Worn together, the two placements are visible from almost any angle the ear is seen from, making this one of the more attention-grabbing pairs on this list rather than something subtle.
12. Snug Piercing With a Cluster of Constellation Lobes Underneath
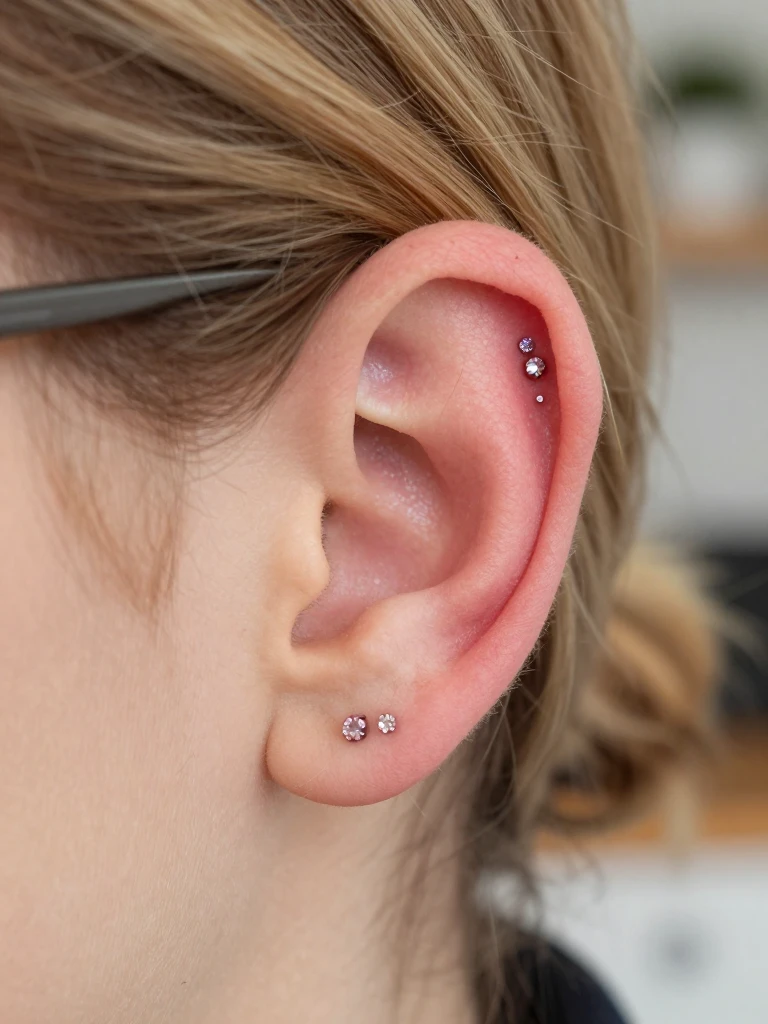
A loose, slightly asymmetrical scatter of three or four small gem studs sits across the lobe below a plain snug bar, giving the ear a star-like effect that contrasts with the single clean line above it. This scattered look is often called a constellation piercing style, since it mimics how stars sit unevenly rather than in a grid.
A perfectly even row of lobe studs reads as generic, while a slightly irregular scatter looks more like it happened organically over time. This is a lobe-heavy look, so aside from the snug itself there’s no additional cartilage healing to plan around. Lobe piercings are far more tolerable than cartilage work and typically heal within six to eight weeks, well ahead of the piece above them.
Tip
- Mark dot placement for all lobe studs in one sitting even if you’re getting them pierced across multiple visits, so the spacing stays intentional rather than random.
- Mix stud sizes slightly rather than using four identical ones. Uniform sizing is what makes a cluster look flat instead of scattered.
- Avoid clustering studs closer than 4mm apart on the lobe, since tighter spacing raises the odds of piercings growing into each other over time.
Styling Note
This is the most lobe-forward combination on the list, easy to wear daily without much thought, and works whether the piece above it is dressed up or left completely plain.
See Also: 19 Ear Piercing Ideas That Make Every Stack Feel Intentional
13. Snug Piercing and Industrial Bar Pairing
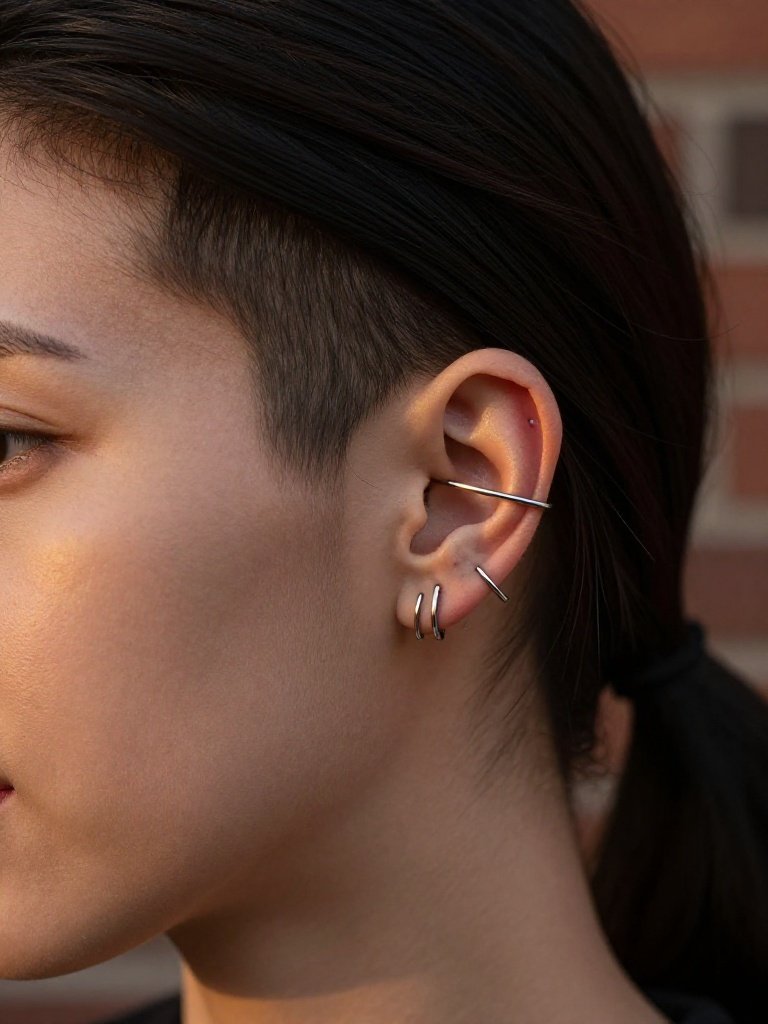
An industrial bar, essentially one long cartilage bar spanning two piercing sites, runs straight across the upper helix and combines with the horizontal line lower down to give the ear two intersecting geometric elements instead of the usual mix of separate round studs. It’s a bolder, more graphic look than most pairings on this list, and it needs an ear with enough helix cartilage to support the bar without the two piercings crowding each other. Industrial piercings are generally considered one of the more demanding cartilage placements to heal, often taking closer to a full year since it’s really two piercings connected by one bar.
Tip
- Have your piercer assess whether your ear anatomy has enough helix length for an industrial bar before booking, since not every ear shape supports it comfortably.
- Get the industrial done as its own appointment, fully separate from the other piece, given how much healing time the bar alone requires.
- Choose a bar with a low-profile ball end rather than a decorative one at first. A bulkier end on a fresh industrial snags on everything from hats to headphones.
Styling Note
This pairing reads as one of the more architectural options here, visible at almost any angle, and it tends to be worn as the ear’s main statement rather than alongside a lot of other jewelry.
14. Snug Piercing With a Snake Charm Barbell End
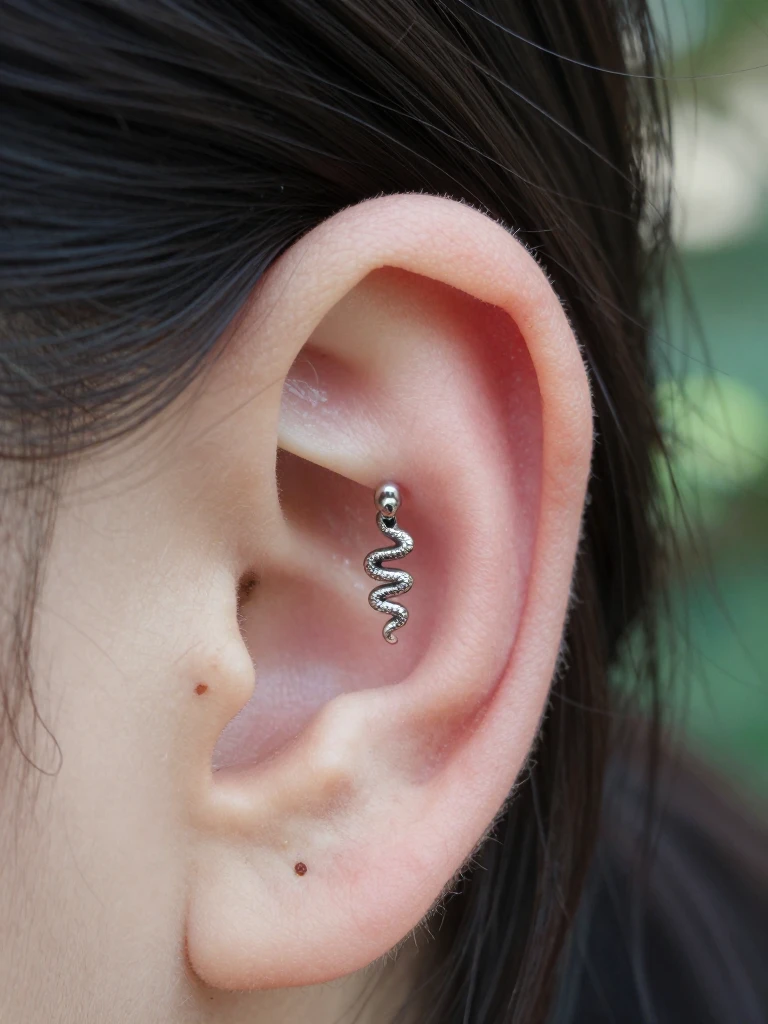
A tiny coiled snake takes the place of the plain ball on this curved barbell, sitting as the front-facing charm right where this placement shows most. It’s a small enough detail that it doesn’t compete with other jewelry nearby, but it’s distinct enough to notice up close, which is the appeal for anyone who wants a themed piece without it taking over the whole ear. The charm sits flush against the same curved bar as the standard version, so it doesn’t change the placement, the healing process, or the six-month-to-a-year timeframe at all.
Tip
- Choose a flat-backed charm design rather than one with raised detail, since anything that sits proud of the ear catches on hair and pillowcases constantly.
- Ask whether the charm is soldered or threaded onto the bar. A threaded design is easier to swap out later if you change jewelry styles.
- Keep the charm small relative to the ear. An oversized motif in this placement tends to look busy rather than intentional.
- Avoid a charm with legs or wire detail that could snag on hats or headphones during the early healing weeks.
- Ask whether the charm can be swapped onto a different bar length later, in case sizing needs to change once swelling goes down.
Styling Note
This is a good option for someone who wants one memorable detail rather than a full stack, and it’s typically worn on an ear that’s otherwise kept fairly simple.
15. Snug Piercing With Mismatched Gem Ends
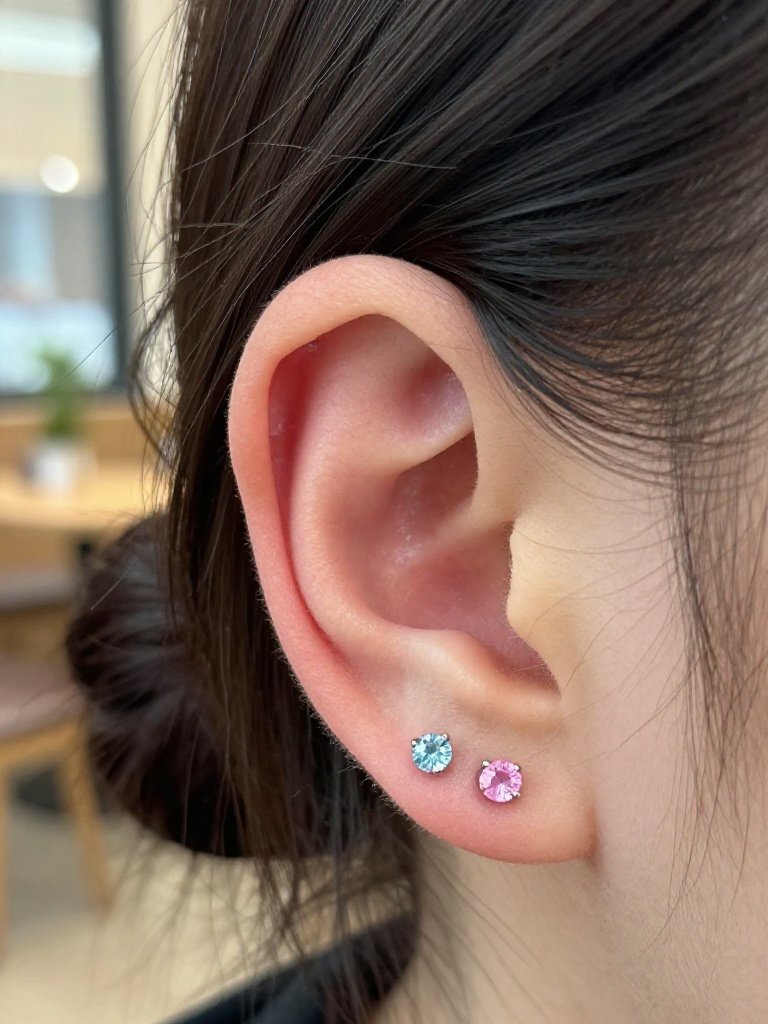
Mismatched stones dress up the curved barbell here, a pale blue on one end and a soft pink on the other, so the asymmetry itself becomes the detail rather than an afterthought. It leans into a broader trend of intentionally mismatched jewelry rather than perfectly coordinated sets. Because both ends sit close together on a short bar, the color difference is only really visible from certain angles, which keeps it feeling subtle rather than loud. Healing-wise this behaves exactly like the standard version, a moderate pinch during the piercing and a settling period that usually runs six months to a year.
Tip
- Pick two stone colors from the same undertone family, both cool or both warm, so the mismatch reads as styled rather than accidental.
- Ask your piercer whether both stone settings use hypoallergenic jewelry, since two different metals sitting this close together increases contact for sensitive ears.
- Avoid mismatching stone size along with color. Keeping both ends the same size stops the look from tipping into cluttered.
Styling Note
This detail mostly rewards close-up viewing, so it works best on an ear where the surrounding jewelry is kept simple enough that this piece doesn’t get visually lost.
16. Minimalist Snug Piercing With a Single Threadless Flat Back
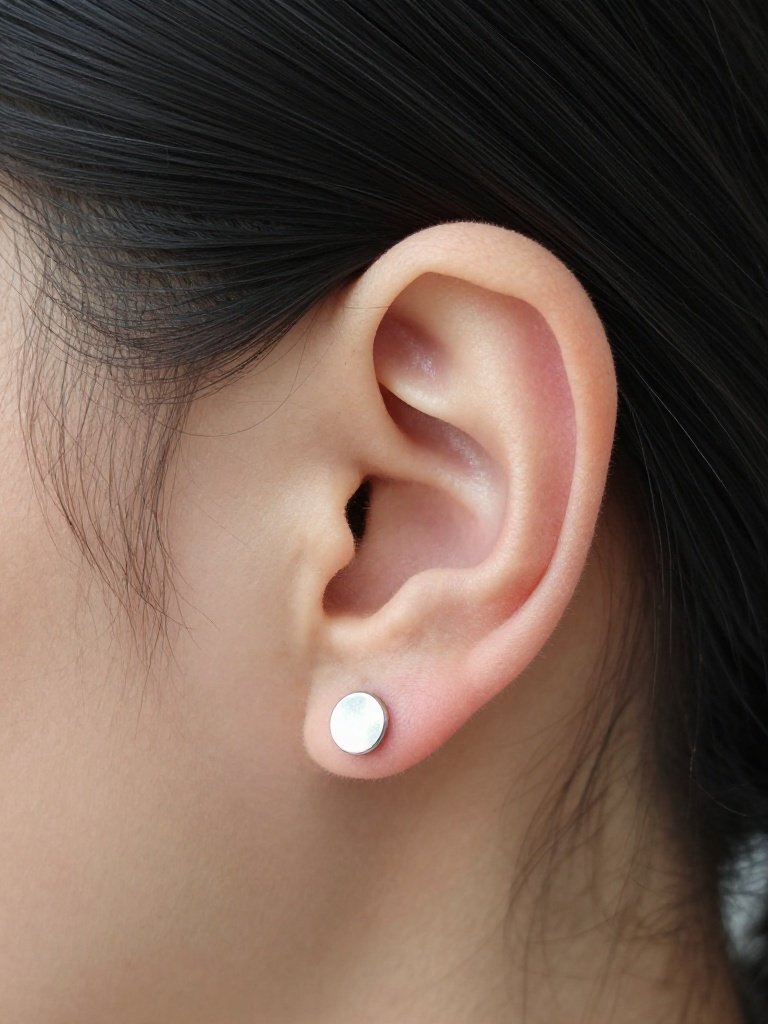
A flat-back post, sometimes called a labret stud, rather than a traditional curved barbell gives this placement a noticeably lower profile, sitting closer to the ear than a standard bar does. It’s become a popular swap for people who found their original curved barbell too bulky for the anatomy of their specific ridge. The threadless design pops in and out without unscrewing, which makes routine jewelry changes simpler once things are fully healed, though it’s still worth having a piercer handle the swap the first few times. Since it’s the same anti-helix placement as any other version, expect the same moderate discomfort during piercing and a six-month-to-a-year healing arc.
Tip
- Ask specifically for a flat-back post rather than assuming it’s the default, since curved barbells are still the more common starting jewelry for this placement.
- Confirm the post length with your piercer in person rather than ordering online, since a post that’s too short puts pressure directly on the healing site.
- Have a professional do the first jewelry change even though threadless posts pop out easily. Doing it yourself too early risks pushing the piece in at the wrong angle.
- Wait until healing is at least six months settled before switching from a curved barbell to a flat back, even though the swap itself is quick.
Styling Note
The low profile keeps this one nearly invisible from a distance, making it a solid choice if you want the piercing itself more than you want it to be a visible style statement.
Snug Piercing Healing and Aftercare Basics
A snug piercing requires patience because cartilage takes longer to heal compared with softer tissue piercings. While the outside may look normal after several months, the inside of the cartilage can continue healing for much longer.
During the healing period, avoid sleeping directly on the piercing, wearing tight headphones, or constantly touching and rotating the jewelry. Pressure and friction are two of the biggest reasons cartilage piercings become irritated.
Avoid Changing Jewelry Too Early
Changing a snug piercing too soon can restart irritation and delay healing. Most people should wait until the piercing is properly settled before switching from basic jewelry to decorative ends.
Keep Hair and Products Away
Hair products, makeup, and skincare products can easily collect around cartilage jewelry. Keeping the area clean and avoiding unnecessary contact helps maintain a healthier healing environment.
Downsizing Improves Comfort
Starter jewelry is usually longer to allow room for swelling. Once swelling decreases, a professional piercer can downsize the bar, reducing movement and making the piercing more comfortable.
Quick Comparison
| Style Name | Best Placement | Pain/Healing Level | Visibility |
|---|---|---|---|
| Single Ball Snug | Anti-helix ridge | Moderate, 6-12 months | Low |
| Snug + Rook Stack | Anti-helix and rook | Moderate, 6-9 months | Medium |
| Gold Hoop Constellation | Snug through helix | Moderate, 4-8 months | High |
| Silver Hoop Cascade | Snug through lower helix | Moderate, 6-8 months | Medium |
| Snug as a Hoop | Anti-helix ridge | Moderate, 6-12 months | Medium |
| Faux Snug Cuff | Anti-helix fold | None, no healing | Medium |
| Opal End Snug | Anti-helix ridge | Moderate, 6-12 months | Low |
| Snug + Daith Duo | Anti-helix and daith | High, up to 12 months | Low |
| Snug + Tragus Stack | Anti-helix and tragus | Moderate, tragus heals faster | High |
| Snug + Conch Chain | Anti-helix to conch | Moderate, both fully healed | Medium |
| Anti Snug Pairing | Outer rim and inner ridge | Moderate, 6-12 months | High |
| Constellation Lobes | Lobe below snug | Low, lobes heal fast | Medium |
| Snug + Industrial | Anti-helix and upper helix | High, up to 12 months | High |
| Snake Charm Snug | Anti-helix ridge | Moderate, 6-12 months | Low |
| Mismatched Gem Ends | Anti-helix ridge | Moderate, 6-12 months | Low |
| Threadless Flat Back | Anti-helix ridge | Moderate, 6-12 months | Low |
Frequently Asked Questions
Snug piercing vs conch piercing: what’s the difference?
A snug piercing passes through the anti-helix ridge, the inner fold of cartilage, so it sits horizontally in the middle of the ear. A conch piercing sits in the flatter, open shell-shaped cartilage below it, usually holding a stud or a large hoop rather than a bar. They’re often worn together but occupy different parts of the ear’s structure.
What’s the average snug piercing healing time?
Most people are looking at somewhere between six months and a full year before a snug piercing feels completely settled, since it passes through a thicker fold of cartilage than a lobe or helix. Healing timelines shared on snug piercing Reddit threads vary quite a bit person to person, so treat any single number as a rough range rather than a guarantee.
Can Everyone Get a Snug Piercing?
Not everyone has the right ear anatomy for a snug piercing. The inner cartilage ridge needs enough space and definition for the jewelry to sit comfortably. A professional piercer should always evaluate your ear before confirming placement.
What Jewelry Size Is Used for a Snug Piercing?
Most snug piercings are started with a curved barbell, commonly around 16 gauge. The exact length depends on your ear anatomy and swelling, so sizing should be chosen by your piercer rather than purchased blindly.
Why Does My Snug Piercing Stay Swollen for Months?
Cartilage heals slowly, and snug piercings experience pressure from sleeping, headphones, hair, and daily movement. Mild swelling can happen during healing, but persistent pain or irritation should be checked by a professional piercer.
Where To Start
A snug piercing is one of those placements where simplicity usually works best at the beginning. A small titanium curved barbell allows the cartilage to heal while giving you a clean base to build from later.
Once the piercing is fully settled, you can experiment with gemstones, gold finishes, chains, and curated ear combinations. The best snug piercing style is not only about the jewelry you choose but also about how naturally it fits your ear and your overall aesthetic.